Keeping all of the data in the correct location can often require some changes to Excel’s display settings, some of which you may not have used before. But once the data is all entered correctly, it’s possible that you need to print all of that data. This creates another problem, where people reading the spreadsheet could have trouble figuring out which column a cell is supposed to belong to. Luckily you can set up your printed spreadsheet so that it repeats the first row at the top of each page in Excel.
How to Repeat Rows in Excel 2010
Our guide continues below with additional information on how to repeat rows in Excel, including pictures of these steps. Learning how to get your Excel rows to repeat at the top of the page is a struggle for anyone who prints or receives a large spreadsheet and finds it difficult to associate a cell of data with the proper column. Many spreadsheet creators will include a row at the top of the sheet that identifies the data in each column, but that row will only print on the first page by default. You may have manually tried to insert that row after page breaks, but this can be tedious and frustrating, particularly if you need to delete rows from the spreadsheet at all. Microsoft Excel has a lot of different ways that you can customize your spreadsheets. However, many of these options are centered around enhancing the experience for users that are looking at spreadsheets on the computer. This is not to say that Excel doesn’t have a number of helpful methods for improving printed documents, however. There are many ways to customize the margins, orientation, and size of the data that you want to print in Excel to improve the readability of the sheet when it is printed on paper. But multi-page documents suffer from an additional problem where someone viewing the printed spreadsheet may have difficulty tracking the column that a piece of data belongs to. You can overcome this problem by learning how to repeat a row at the top of each page in Excel 2010.
How to Print a Specific Row at the Top of Every Page in Excel (Guide with Pictures)
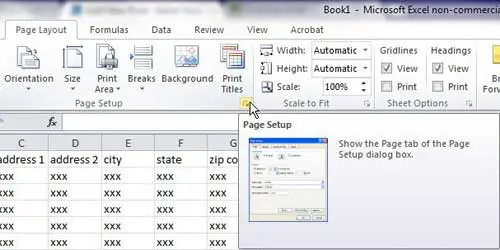
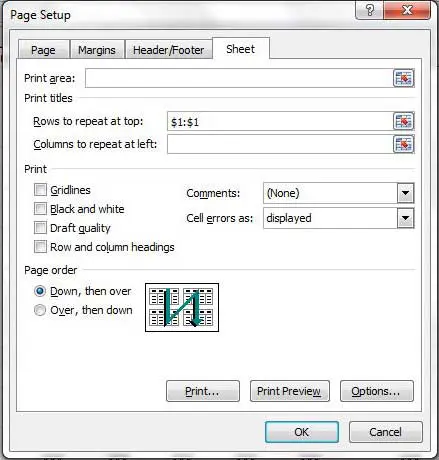
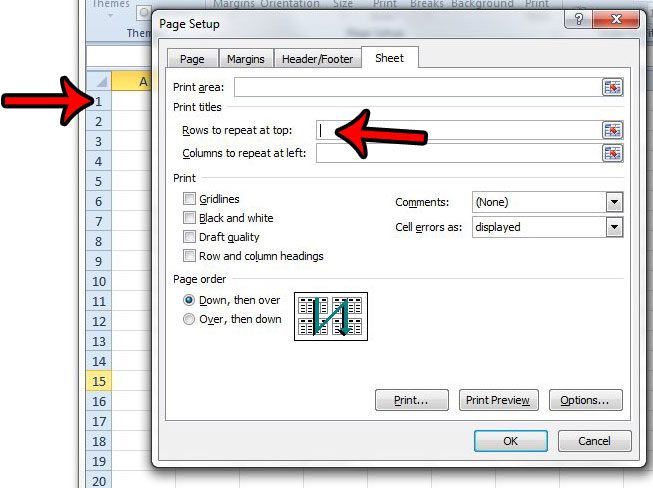
Repeating a row on each page of a spreadsheet in Excel 2010 is dependent upon your use of column headings for your sheet. While typical usage involves these headings being located in the first row of the spreadsheet, you can specify any row to repeat at the top of your sheets, if you so choose. If you are having difficulty getting the information in the Rows to repeat at top field to display correctly, try clicking in that field first, then click the row number to the left of the spreadsheet. You can either launch Excel 2010, then use the Open command on the File tab, or you can simply double-click the file in Windows Explorer to automatically open the file in Excel 2010. It’s a very small button that looks like a square with an arrow on it. You will note that there are a lot of helpful other options on this screen for improving the display and layout of your document, such as page orientations, margins, headers and footers, as well as the Sheet tab, on which you can click the Gridlines option to print the gridlines with your spreadsheet. But for the purpose of repeating a row at the top of each page in Excel 2010, we need to use a different option on the Sheet tab. For example, in the image below I am going to repeat the first row at the top of each page. So I clicked the row label for row 1, which entered $1:$1 into the Rows to repeat at top field. You can now press Ctrl + P on your keyboard to open the Print window. If you cycle through your pages in the Print Preview section of the page, you will note that the row that you selected is now being displayed at the top of each page. Our guide continues below with more tips on repeating rows at the top of every page in Excel.
What Else Can I Do on the Page Setup Dialog Box in Excel?
Once you have clicked the small Page Setup button you will see four tabs at the top of the window. These tabs are:
PageMarginsHeader/FooterSheet
Each of these tabs includes related information and settings that you can customize so that your spreadsheet looks better when you print it. Many of the settings on this menu are going to affect every printed page of your worksheet. While we have focused on repeating a header row, or header rows, you can also do things like choose to print gridlines, or add information to a header. While the Page tab in this window will let you change the page size and orientation, if you go back to the Main Excel window, look in the Page Setup group, click Orientation to adjust it there, or select the Size option to choose the size of paper on which your sheet will print.
More Information on How to Get Rows to Repeat at Top – Excel 2010
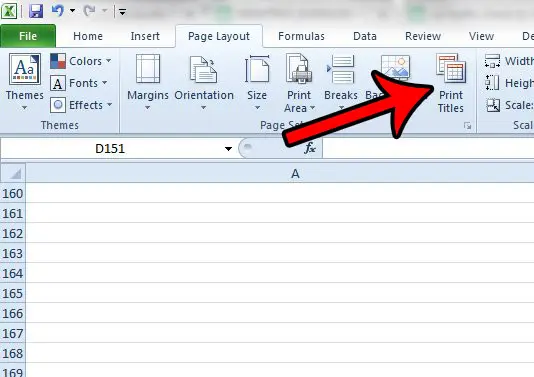
As mentioned in the summary above, you can also repeat a row at the top of the page by clicking the Print Titles button on the Page Layout tab. The Page Setup button that you need to click in the Page Setup group is a very small button that is at the bottom of that section in the ribbon. It looks like a tiny square with a diagonal arrow on it. Many people don’t realize that this is a clickable button, as it is very easy to miss. If you have an Excel file with multiple worksheets, then it’s possible that you might want to apply some of your printing changes to more than one worksheet. While you can go through each individual sheet tab and customize title rows and column headers in each of those sheets, you can also select more than one page by holding down the Ctrl key on your keyboard and clicking each worksheet tab that you wish to modify. Each worksheet selected will then be affected by the changes that you make to the active worksheet. Grouping sheets like this is a helpful way to make the printed pages of your workbook all have the same worksheet settings, as well as help to ensure that you remember to do things like print row information or place header information in the same top box on every worksheet. Once you’re done applying changes to multiple worksheets you can right-click a selected worksheet tab and click Ungroup Sheets to go back to the mode where you are only editing one worksheet. Learning how to get your Excel rows to repeat at the top of the page is just one of many useful adjustments you can make to improve the way a spreadsheet prints. Our Excel printing guide includes several other helpful settings and features that can make printing a little easier.
Additional Sources
If you select the Page Layout tab at the top of the window you can click the Print Titles button in the Page Setup group on the ribbon. This also opens the Page setup dialog box, where you will be able to set the title row for your Excel spreadsheets. Just click inside the cells in the first row of your spreadsheet and add a word or phrase to describe the information in that column. For example, if you have a spreadsheet with names, you might make a title for “first names” and another one for “last names.” You can either manually adjust the information in the “Rows to repeat at top” field, or you can click and drag to select multiple rows if you are using your mouse. For example, If I wanted to repeat the top three rows, then I would have $1:$3 in the “Rows to repeat at top” field.
After receiving his Bachelor’s and Master’s degrees in Computer Science he spent several years working in IT management for small businesses. However, he now works full time writing content online and creating websites. His main writing topics include iPhones, Microsoft Office, Google Apps, Android, and Photoshop, but he has also written about many other tech topics as well. Read his full bio here.
You may opt out at any time. Read our Privacy Policy


