Attaching Files to an Email in Outlook 2013
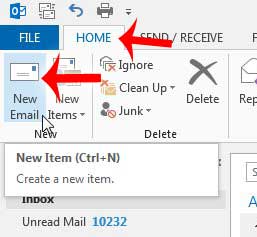
You will need to know the location of the file that you want to attach to your email in order to perform the steps outlined below. Additionally, keep in mind that many email providers have limitations on the size of files that you can attach to your email messages. It is a good idea to try and keep attachments to a maximum of 5 MB, but some providers will allow attachments that are larger. If you are trying to send a larger file and it is not going through, then it is a good idea to contact your email provider and find out the maximum file size that they allow. Step 1: Launch Outlook 2013. Step 2: Click the Home tab at the top of the window, then click the New Email button in New section of the ribbon at the top of the window.
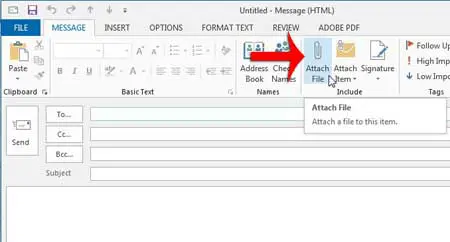
Step 3: Click the Attach File button in the Include section of the ribbon at the top of the window.
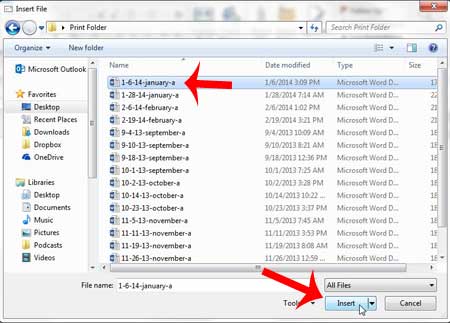
Step 4: Browse to the file that you want to attach to the email, click it once to select it, then click the Insert button at the bottom of the window.
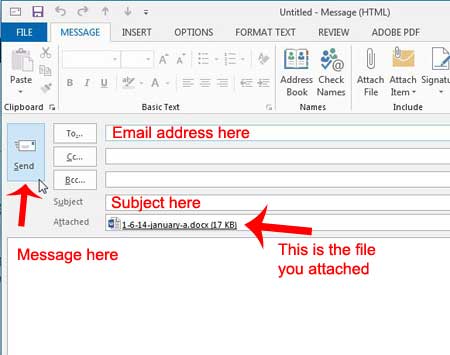
Step 5: Enter the address of the recipient into the To field, enter the message subject into the Subject field, then enter your email message into the body of the email. Note that the attachment is displayed in an Attached field. Click the Send button when everything is finished and ready to go.
If you are looking for an email with an attachment in Outlook 2013, read this article to learn how you can filter your Outlook 2013 search results to only display email messages that contain attachments. After receiving his Bachelor’s and Master’s degrees in Computer Science he spent several years working in IT management for small businesses. However, he now works full time writing content online and creating websites. His main writing topics include iPhones, Microsoft Office, Google Apps, Android, and Photoshop, but he has also written about many other tech topics as well. Read his full bio here.
You may opt out at any time. Read our Privacy Policy


