After you have spent some time investigating you will be ready to complete our buy blog domain name process using GoDaddy. You will then be the owner of that domain name and you will be able to link it to a hosting company and set up a custom email with something like Google Workspace. Speaking of Google Workspace, you can also read our create website Google Workspace guide if you want to use Google’s website application for your site.
How to Buy a Blog Domain Name from GoDaddy
Our guide continues below with additional information on how to buy blog domain names from GoDaddy, including pictures of these steps. If you have been thinking about starting your own blog and are ready to put your plan in action, then congratulations! Creating and writing a blog on a topic about which you are passionate can be incredibly fulfilling, and it can even make you some money. But if you have never started a website before, then it can be a little intimidating. Words like “domain” “hosting” and “WordPress” may be foreign to you, but they are all very approachable, and you can get started today without spending a lot of money. The first thing that you need to take care of is registering a domain for the blog. This is the address where people will go to read what you have written. For example, this article is hosted on www.solveyourtech.com, which means that the domain name is solveyourtech.com. There are millions of websites on the Internet right now, and no two of these websites can have the same domain name. This means that you need to decide on a new domain name that is not already being used before you can purchase it.
Finding an Available Domain Name
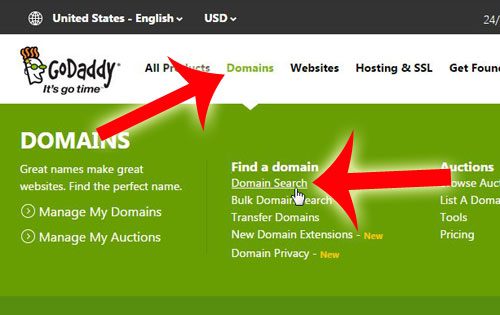
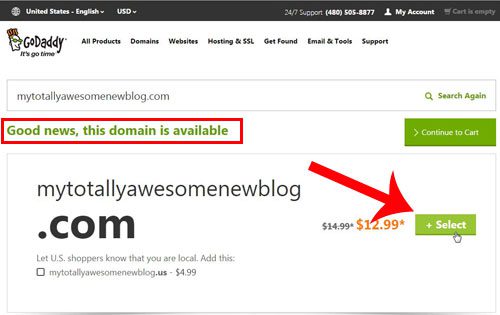
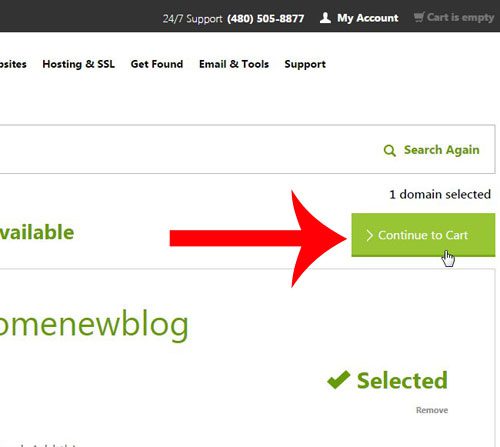
We are going to start the process of buying a domain name by visiting GoDaddy and using their search tool. We will also be purchasing the domain name from GoDaddy, so you will want to create an account by clicking here, then clicking Register at the top of the window. Once you have registered for a GoDaddy account, you can click Domains at the top of the window, then click the Domain Search option. Type a potential name for your blog into the search field, then click Search until you find one that is available. Once you have an available domain name, click the green Select button to add it to your cart. You can then click the green Continue to Cart button to go to your cart and begin the checkout process.
Deciding on Any Additional Options
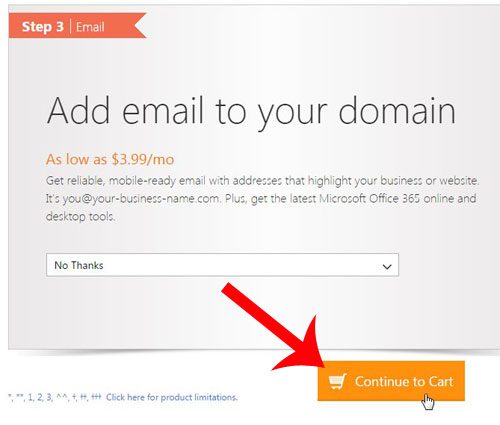
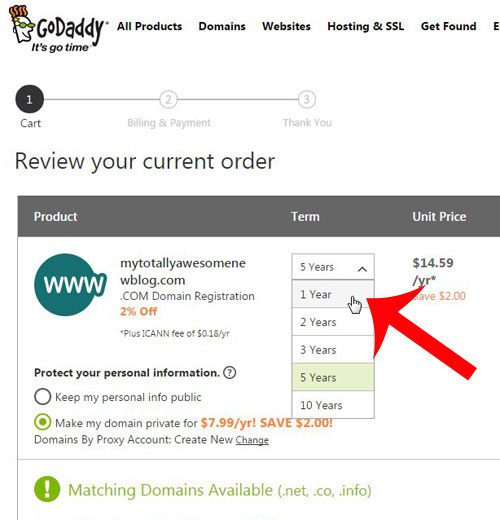
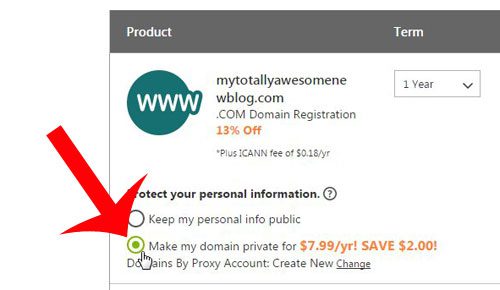
You will now have the option of choosing whether you want to add privacy to your domain. This can be beneficial if you do not want your name, address, email address and phone number to show up when people check the WHOIS information for your website, but it is not required. If you elect to use privacy, then people will see the privacy contact information that GoDaddy provides instead of your personal information. You will also have the option of selecting a hosting package with GoDaddy or choosing to add email to the domain, but we will not be covering that in this article. I personally prefer to register my domains at GoDaddy and set up my hosting elsewhere (such as BlueHost), but the decision is entirely up to you. Note that most hosting services will also provide you with email hosting, so you do not have to use the GoDaddy email hosting if you do not want to. We will be covering how to set up a hosting account at BlueHost using the domain that we just purchased from GoDaddy in another article. Once you have decided on the options on this screen, you can click the orange Continue to Cart button at the bottom of the window.
Selecting the Term Length for the Domain
Domain names must be registered in yearly increments, for a minimum of one year. There are typically discounts for registering for multiple years, however, if you decide that you want to save some money and lock down your domain for an extended period of time. Many bloggers that are just starting out will elect to register for one year, which will require the least amount of money upfront, and it won’t force you to stick with the same domain name for years in case you decide after a month or two that you no longer like your first choice. If you decide later that you want to keep the domain after the one year domain registration has expired, you will have the option to extend the registration for additional years. So there’s no need to worry that you will lose the domain name, as GoDaddy will contact you before the registration expires to let you know that you need to renew it. You can also make a decision about the privacy settings for the domain on this screen as well, in case you have changed your mind since the last screen. Once you have selected your preferred options on this screen, you are ready to begin the checkout process and purchase the domain.
Conclusion
After you have entered your payment information on the last screen and clicked the Place Your Order button, then you officially own your own domain name! Congratulations! You have taken the first step towards starting your blog. The next thing to tackle will be your hosting, which we will be covering in a future article.
Additional Sources
After receiving his Bachelor’s and Master’s degrees in Computer Science he spent several years working in IT management for small businesses. However, he now works full time writing content online and creating websites. His main writing topics include iPhones, Microsoft Office, Google Apps, Android, and Photoshop, but he has also written about many other tech topics as well. Read his full bio here.
You may opt out at any time. Read our Privacy Policy