A lot of document editors won’t care about the alignment or positioning of a table, but you may find that you don’t like the way it looks. Fortunately, you can learn how to center a table in Google Docs if you want it to appear in the middle of the page.
How to Center a Google Docs Table
Our article continues below with additional information on how to center a table in Google Docs, including pictures of these steps. If you would like to know more about ways to get into your Google account, then read this guide for more information. Making objects in a document look good is an important aspect of how your readers perceive that document. This can include things like properly cropping or editing an image, or it can mean aligning objects properly on the page. So you may be wondering how to center a table in Google Docs if you want to make it look better. Learning how to remove strikethrough in Google Docs will show you how to get rid of lines through text, as well as how to add them if needed. When you add a table to a document in Google Docs, that table is aligned to the left side of the page by default. Unfortunately, this may not present the look that you are trying to convey in your document, and you would prefer for the table to be center on the page. You can center a table in a Google document by right-clicking in the table, choosing Table properties, clicking Alignment at the right side of the window, then clicking Table alignment and choosing Center. Not only does this Table properties menu provide you with ways to center the entire table, it also gives you a number of other settings that you may have been looking for that allow you to change the layout and look of your table. The main sections of this article will focus on the table centering element for a table in your document, and whether or not it will provide you with the desired centering effect that you have been looking for. Fortunately, it is possible to make this adjustment by using the Table properties menu for that table. Our tutorial below will show you where to find this menu so that you can center your Google Docs table. Some other formatting you might need to adjust is the spacing. Check out our tutorial on how to remove space between paragraphs in Google Docs for some tips.
How to Center Align a Google Docs Table (Guide with Pictures)
The steps in this article were performed in the desktop version of the Google Chrome Web browser but will also work in other desktop Web browsers like Firefox or Edge.
Step 1: Sign in to your Google Drive at https://drive.google.com and open the document containing the table that you wish to center.
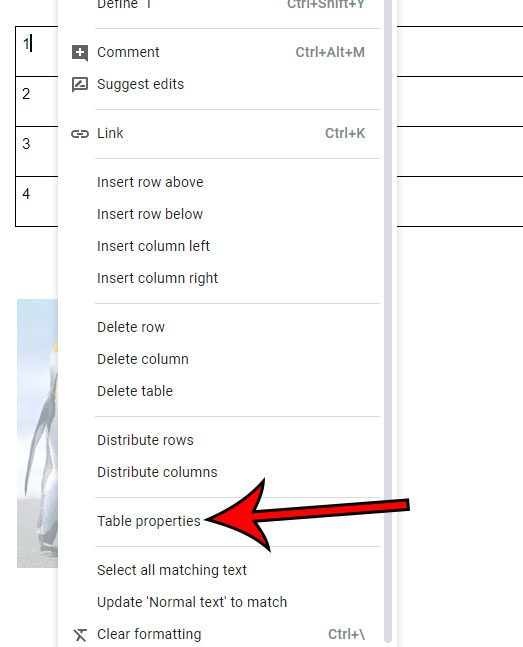
Step 2: Right-click inside any of the table cells, then choose the Table properties option.
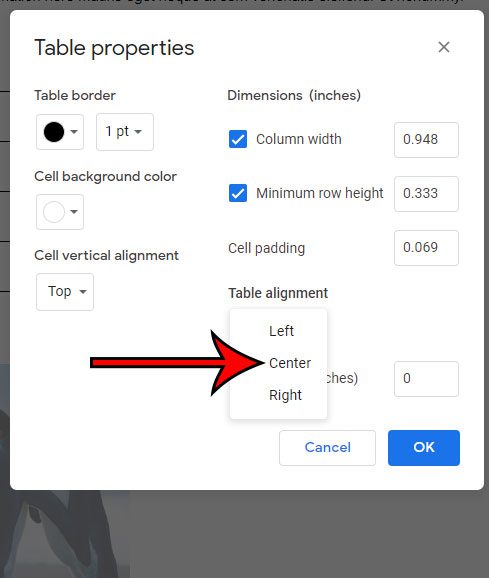
Step 3: Click the dropdown menu under Table alignment, then click Center.
In newer versions of Google Docs the “Table properties” window is actually now a column at the right side of the window, and you can change the Table alignment setting by expanding the “Alignment” section in that column.
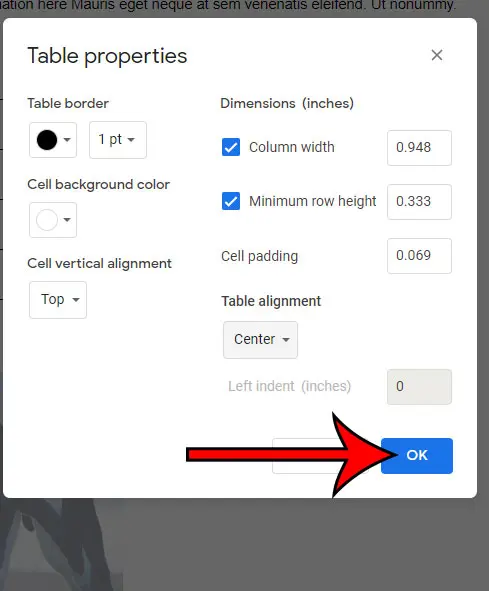
Step 4: Click the OK button to apply the change.
Now that you know how to center a table in Google Docs you might want to change the alignment of the data that’s inside the table cells as well. The next section provides steps on how to accomplish that. Our guide on how to center text in Word will show you a few ways that you can do similar alignments in the Microsoft application.
How to Center Align Data in a Google Docs Table
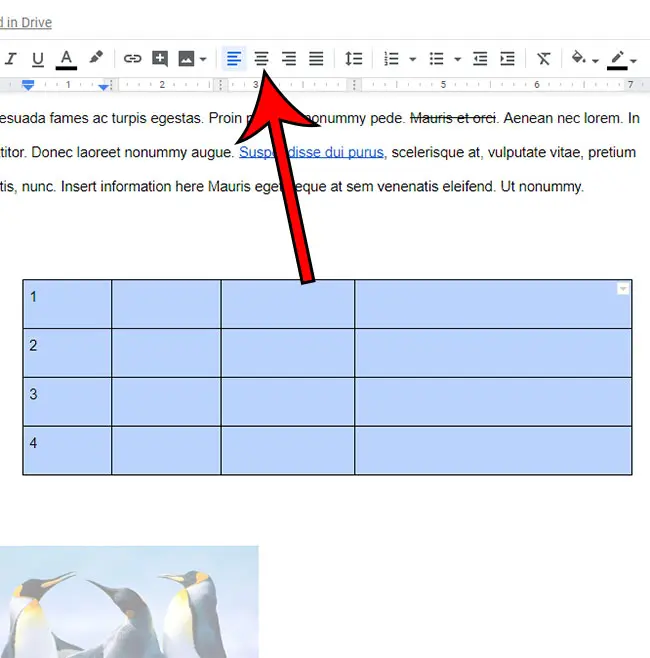
If you wish to center align all of the data inside your table cells as well, then click and hold on the bottom-right cell, then drag your mouse to the top-left cell to select each cell. You can then click the Center align button in the toolbar. All of the data in your table should now be in the middle of the table cells, so you can continue to use this method whenever you need to know how to center text in table in Google Docs. Our tutorial continues below with additional discussion about this Google Docs center table method, as well as other ways that you can affect the display and appearance of a Google Docs table. One less common formatting option you can encounter in Google Docs involves making small numbers that go above or below the baseline. Our guide on how to do subscript in Google Docs will show you how to use this tool.
More Information on Google Docs Table Centering and the Table Properties Window
While the steps we outlined above provided you with ways to center an entire table in a Google Doc when you already have an existing table, you may be looking for other ways to change the look of the tables in your Google documents. This guide on how to add more rows to a table in Google Docs will help you to adjust the layout of a table that you have in your document. Perhaps the easiest way to make a lot of these changes is via the Table Properties window. You can get to this menu by right-clicking in a table cell, then choosing the Table properties option. This opens a new “Table Properties” column at the right side of the window, which is effectively the Format menu for any tables that you have added to your document. Here you will find a number of different options, including:
Minimum row heightPin header rowAllow row to overflow across pagesColumn widthCell vertical alignmentTable alignmentLeft indentCell paddingTable border colorTable border widthCell background color
Note that the right-click menu where you found the Table properties option includes most of the other settings that you need to adjust the layout of your table, including things like:
Insert row aboveInsert row belowInsert column leftInsert column rightDelete rowDelete columnDelete tablePin header up to this rowSort tableDistribute rowsDistribute columnsTable propertiesInsert link
Are the columns in your table all different sizes, and it doesn’t look very good? Find out how to make all columns the same width so that you don’t have a couple really thin or wide columns in the table. Need a text box in your document? Our guide on can you make a text box in Google Docs article will show you how to do this with the Drawing tool. You can make this change by selecting the data that you want to center, then clicking the Center Align button in the toolbar above the document. You can also center text by selecting the text, choosing the Format tab at the top of the window, then choosing the Align & indent option, then choosing Center.
- Select the text.2. Click the Center Align button in the toolbar. You can use the same method if you want to left align or right align your text instead. You can make a column wider and make the centering more noticeable by clicking and holding on the column border, then dragging it to the left or right to expand the column. The same concept applies if you would also like to make a row taller. You would need to click the row border instead, then drag it up or down. You can make a table in Google with the below steps:
- Choose the spot in the document where you want the table.2. Select Insert at the top of the window.3. Choose the Table option.4. Click the number of columns and rows you want in your table. If you have a table that you don’t need anymore, then our tutorial on how to delete a Google Docs table can show you how to get rid of it.
- Click Insert, then Table, then the 2 x 1 option.2. Click inside the left cell.3. Click Insert, then Table, then choose the dimensions for the left table.4. Click inside the right cell.5. Click Insert, then Table, then choose the dimensions for the right table. If you want to remove the border for the outermost table then just right-click inside one of the cells in the outer table, then choose Table properties. You can then select the Color section in the right Table properties column, click the Border color button and choose the white color.
Additional Sources
After receiving his Bachelor’s and Master’s degrees in Computer Science he spent several years working in IT management for small businesses. However, he now works full time writing content online and creating websites. His main writing topics include iPhones, Microsoft Office, Google Apps, Android, and Photoshop, but he has also written about many other tech topics as well. Read his full bio here.
You may opt out at any time. Read our Privacy Policy


