But sometimes you need to add some text to a picture, which can seem difficult to do in the application. Luckily you find out how to change the order of your layers in Google Slides and place a text box on top of an image, or position any of your other objects on top of one another.
How to Change the Order of Your Google Slides Layers
Our article continues below with additional information on changing the layer order in Google Slides, including pictures of these steps. Do you let Google Chrome save passwords so that it can enter them automatically? You can see those passwords in case you need to use them elsewhere. Find out more with our saved passwords on Google guide. Sometimes you might want to adjust your slide objects so that one is on top of another. For example, you might want to send an image to the back in Google Slides so that you can place something like a circle on top of it. Fortunately, it’s possible to change the layer order in your presentation. The drag and drop nature of organizing elements on a slide in Google Slides can create a situation where a slide object is being hidden by another object. Often this can be resolved by simply moving those objects so that they aren’t overlapping, but you may have something, such as a text box, that you would like to appear on top of something else. Fortunately Google Slides lets you manage the order of your slide objects as layers, which allows you to choose which elements appear on top of other elements. Our tutorial below will show you how to change the layer level for an object in Google Slides so that you can specify which object is on top. Would you like to use Google Slides to edit existing slideshows? Our article on converting Powerpoint to Google Slides without losing formatting will show you how.
How to Bring a Google Slides Layer to the Front (Guide with Pictures)
The steps in this article were performed in the desktop version of Google Chrome. This guide is going to show you how to adjust the levels of slide objects that overlap. The specific example we use in this article is a text box that you want to put on top of a picture, but the picture is currently hiding some of the text.
Step 1: Sign into Google Drive and open the presentation containing the slide objects that you want to reorder.
Step 2: Select the slide object whose layer you want to adjust.
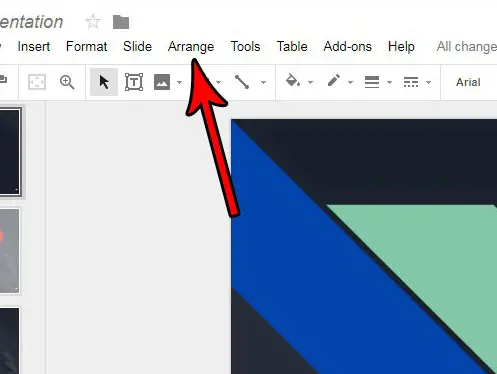
Step 3: Choose the Arrange tab at the top of the window.
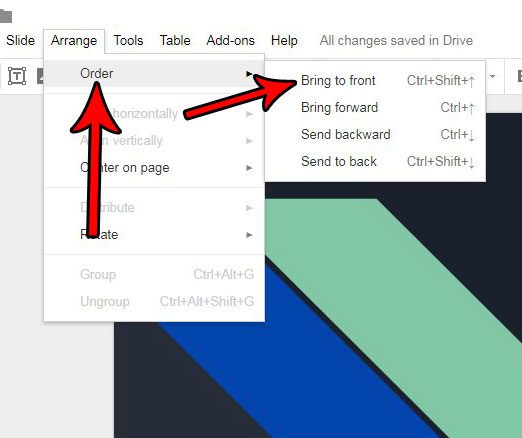
Step 4: Select the Order option, then click the action that you want to take.
If the object is currently hidden by another layer, then choose the Bring to front option. If you want to put the layer behind another object, then choose the Send to back option. Now that you know how to change the layer order in Google Slides you will be able to fix many of the layout issues that you might be experiencing with your presentations. Related Topic: Check out our insert text box Google Docs tutorial if you need to layer objects in documents, too, such as putting text on top of a picture. If your slide contains multiple objects that need to overlap, then you can use the “Bring forward” or Send backward option to adjust its positioning by one layer. Selecting the “Bring to front” option or the “Send to back” option will make the object either the top layer or the bottom layer, respectively. Does a picture in your slideshow need some edits? Find out how to crop a picture in Google Slides if it contains elements that you don’t wish to use in your slide. If you’ve taken a picture of something that you can’t identify, then follow these Google reverse image search iPhone instructions to upload that picture from your phone and compare it to others. After receiving his Bachelor’s and Master’s degrees in Computer Science he spent several years working in IT management for small businesses. However, he now works full time writing content online and creating websites. His main writing topics include iPhones, Microsoft Office, Google Apps, Android, and Photoshop, but he has also written about many other tech topics as well. Read his full bio here.
You may opt out at any time. Read our Privacy Policy


