How to Adjust Page Borders in Word 2010
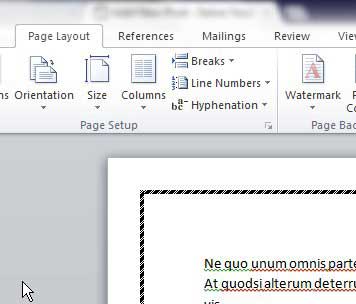
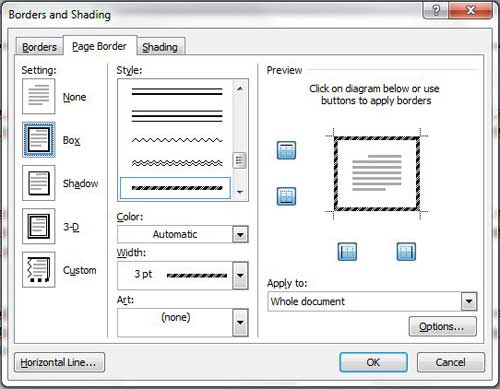
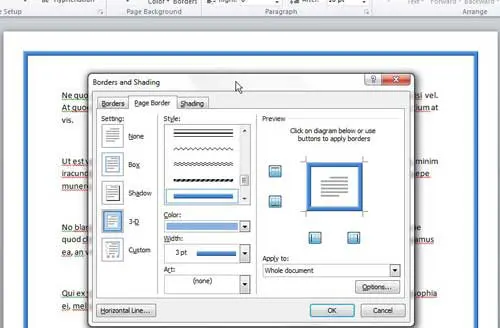
The beauty of using Microsoft Word 2010 for creating documents is the simplicity with which you can make adjustments. This does not apply to just your documents, either. Anything created in Microsoft Word 2010, or any earlier version of Microsoft Word, for that matter, can be edited within the program, and can be edited in the same way. So once you learn how to change the page borders in a Word 2010 document once, you will be able to do it the same way on any future documents. Begin the process of adjusting your Word page borders by double-clicking the file to launch it in Word. At the top of the window are a series of tabs that contain tools and document options that are related to the menu they are contained within. The options that we are interested in for the purposes of this tutorial are located on the Page Layout tab, so click that tab. Underneath the tabs is the ribbon, which is the main navigational tool used in Microsoft Office 2010. The ribbon for the Page Layout tab contains a Page Background section, which holds the Page Borders button. Click this button to launch the Borders and Shading window, where you will be selecting the options for the border that you want to use instead of the one currently set for your document. Confirm that the Page Border tab at the top of the window is selected, then look at the different sections of this window. The left side of the window contains the Setting option, where you are choosing the general type of the new border that you want to select for your document. The center portion of the window is the most important section, where you are going to be able to make the largest changes to the appearance of your border. You can use a combination of the Style, Color, Width and Art drop-down menus to produce an almost infinite amount of border combinations, so do some experimenting before you settle on a design that you are not entirely happy with. At the left side of the window is a preview panel where you can see how the document will look with your current selections. There is also a drop-down menu under Apply to, where you can select which portion of your document you want to apply the border to. Once all of the page border settings are satisfactory, click the OK button at the bottom of the window to apply them to the document. There is no limit to the number of changes that you can make to your Word 2010 page borders, so feel free to come back to this menu at any time if you decide that the page border you selected is not ideal for your document. After receiving his Bachelor’s and Master’s degrees in Computer Science he spent several years working in IT management for small businesses. However, he now works full time writing content online and creating websites. His main writing topics include iPhones, Microsoft Office, Google Apps, Android, and Photoshop, but he has also written about many other tech topics as well. Read his full bio here.
You may opt out at any time. Read our Privacy Policy