Fitting a printed spreadsheet on the correct number of pages in Excel 2010 can be a bit of a balancing act. There are several adjustments that you can make to accomplish it, but perhaps one of the most useful and effective is to adjust the size of the margins on the page. Excel 2010 offers a number of simple margin adjustments, but there is also a Custom Margin option where you have complete control over the size of the margins on your page. Continue reading below to learn how to edit margins in excel 2010. Excel 2010 offers a number of simple margin adjustments, but there is also a Custom Margin option where you have complete control over the size of the margins on your page. Continue reading below to learn how to edit margins in excel 2010.
How to Adjust Margins in Excel 2010
Our tutorial continues below with additional information on changing margins in Excel 2010, including pictures of these steps. If you want to change document margins but don’t want to use inches, then this guide will show you what to do.
How to Change the Margins in Excel 2010 (Guide with Pictures)
We are going to set up custom margins for the purpose of this tutorial, but we will be passing by the preset margin options in the process of doing so. These options are helpful if you just need to make a slight adjustment to your margins, but some people prefer to have complete control over the elements of their printed page. It is important to note, however, that using margins that are too small may result in your printer being unable to print your spreadsheet. If you get a warning or error message after you attempt to print a spreadsheet with very small margins, you may need to increase them until your printer is able to print them.
Step 1: Open the Excel spreadsheet for which you want to adjust the margins.
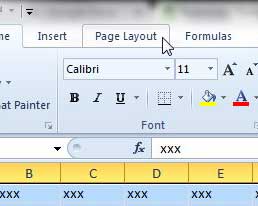
Step 2: Click the Page Layout tab at the top of the window.
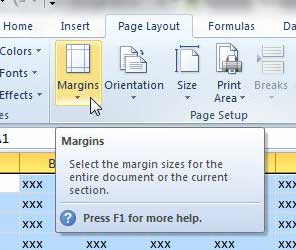
Step 3: Click the Margins button in the ribbon at the top of the window, which will expand a drop-down menu.
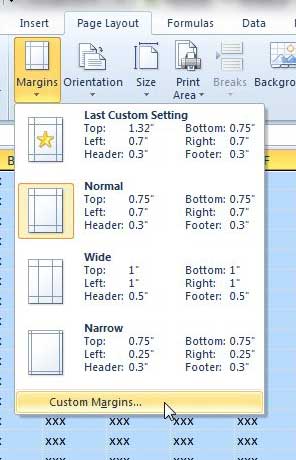
Step 4: Click the Custom Margins option at the bottom of the menu to open the Page Setup dialog box.
You will notice that there are several presets on this menu, including the Narrow option, which can be helpful if you are trying to decrease the size of your margins.
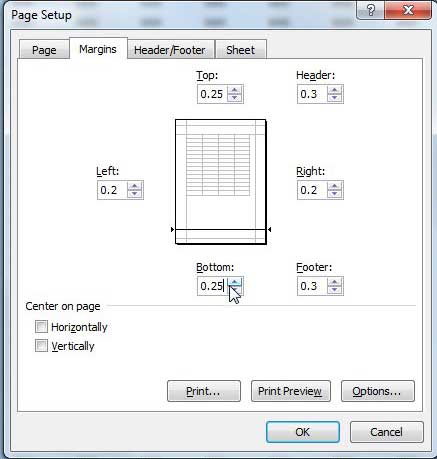
Step 4: Click inside each of the fields in this window for which you want to adjust the margins.
Note that I have changed my side margins to .2, and my top and bottom margins to .25. My printer will print pages with margins that small without issue, and it adds a good amount of additional page space over the Narrow option.
Step 5: Click the OK button at the bottom of the window, or click the Print Preview button to see how your page will print with your adjusted margins.
Our guide continues below with more about Excel page margins.
Microsoft Excel – Change Margins to Narrow or Wide
In my experience, the most common margins that you will use in Excel are the “Normal” option or the “Narrow” option. It’s rare for you to need margins that are larger than the ones that Excel uses by default, and Excel will often give you errors and prevent you from printing if you make margins that are too small. You can use the narrow or wide margin options by going to: Page Layout > Margins > then choose Narrow or Wide As you can see on the Margins drop down menu the dimensions for the Narrow margins are:
Top – .75 inchesBottom – .75 inchesLeft – .25 inchesRight – .25 inchesHeader – .3 inchesFooter – .3 inches
The dimensions for the Wide margins are:
Top – 1 inchBottom – 1 inchLeft – 1 inchRight – 1 inchHeader – .5 inchesFooter – .5 inches
More Information on How to Change Page Margins in Excel 2010
As we mentioned previously, the smaller that you can go with your page margins will be dictated by your printer, and your printer may add some additional margins besides those set in Excel. You can add information to the header in Microsoft Excel by clicking the small Page Setup button at the bottom-right of the Page Setup group in the ribbon, which will open the Page Setup dialog box. You can then click the Header/Footer tab at the top of the window and select the header or footer button. At the bottom of the Margins tab on the Page Setup window is a section labeled “Center on Page.” if you choose either the Horizontally or Vertically option in that section it will center your spreadsheet data in that way on the printed page. I often use the horizontal option, especially with smaller spreadsheets, because Excel will left align your data when it prints, which may not look very good if your data only consists of a few columns. If you open the Print menu from the File menu in Excel you will see a No Scaling button at the bottom of the center column. If you click that button you can choose from options like:
Fit Sheet on One PageFit All Columns on One PageFit All Rows on One Page
If you don’t want to try to manually adjust your margins so that all of your rows and columns fit on one page, then these options can be very useful. For example, choosing the Fit Sheet on One Page option will let you print the entire worksheet on one page automatically, without requiring you to make any adjustments to your Excel worksheet margins. The Page Setup dialog box appears when you select Custom Margins from the Margins drop down menu but you can also open it and change margin settings by clicking the Page Setup button in the Page Setup section of the ribbon. This dialog box lets you set your margins, but also lets you select how to print Excel workbook and worksheet data in other ways by adding headers or footers, printing gridlines, repeating a row or column on each page, and more. Read this article to learn how to fit an Excel spreadsheet on one page. You can also configure a spreadsheet so that it is centered horizontally and vertically when you print it. Read here to learn how. After receiving his Bachelor’s and Master’s degrees in Computer Science he spent several years working in IT management for small businesses. However, he now works full time writing content online and creating websites. His main writing topics include iPhones, Microsoft Office, Google Apps, Android, and Photoshop, but he has also written about many other tech topics as well. Read his full bio here.
You may opt out at any time. Read our Privacy Policy


