This applies to the tables you create, too. Our tutorial below will show you several ways that you can adjust the colors of the table borders and cell backgrounds in Microsoft Word tables.
How to Change Table Border Color in Word 2013
Our article continues below with additional information on changing the table color in Word, including pictures of these steps. Formatting a document in Microsoft Word often consists of adjusting the margins, adding page numbers, or simply trying to adhere to your organization’s formatting guidelines, such as MLA. But when you start adding other objects and media to your document, you can have a little more freedom to customize. If you have a table in Microsoft Word you might even want to change the color of its borders or background. Tables are a great way to display groups of information in a Word document. The grid layout offers a structural option that is difficult to achieve with the paragraph layout that is normally associated with Word documents. While table work is often done in spreadsheet applications like Microsoft Excel, Word does have some useful tools to present table data in an appealing fashion. But a table in Microsoft Word can look a little boring with its default settings, so you might decide to change the color of your Word table. You can achieve this by adjusting the colors of your borders, then applying this change to the entire table.
How to Change Table Color in Microsoft Word 2013 (Guide with Pictures)
The steps in this article will show you how to change the color of your table in Word 2013. This will affect the color of the lines in your rows and columns. If you want to change the color of the text in your table, then you can follow the steps in this article, but only select the table instead of the entire document.
Step 1: Open the document containing the table for which you want to change the color.
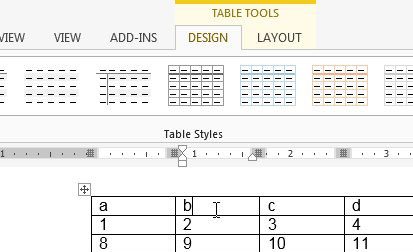
Step 2: Click inside one of the table cells, which will display the Table Tools menu at the top of the window.
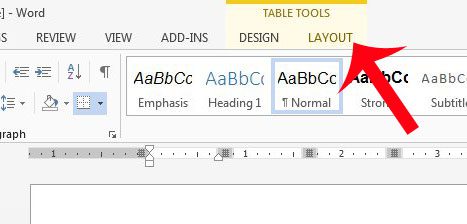
Step 3: Click the Layout tab under Table Tools at the top of the window.
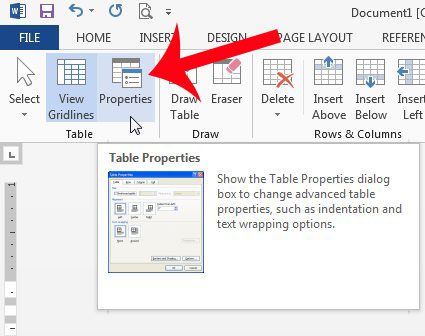
Step 4: Click the Properties button in the Table section at the left side of the navigational ribbon.
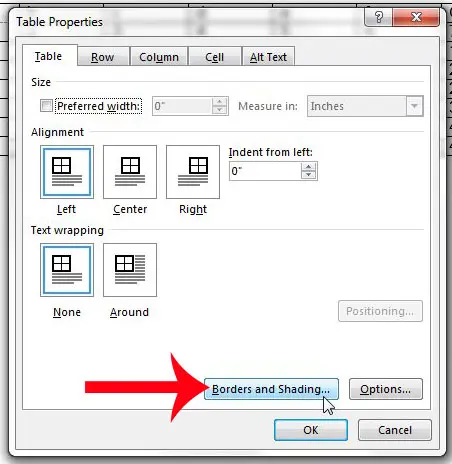
Step 5: Click the Borders and Shading button.
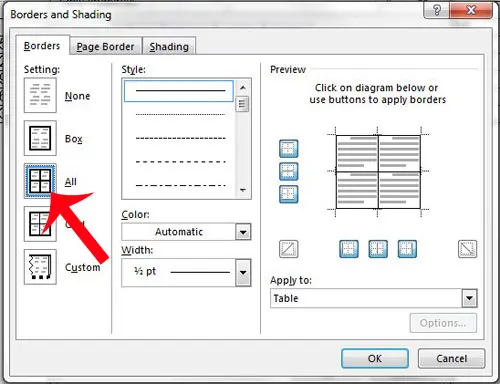
This will open the Borders and Shading dialog box where you will be able to make a number of different changes to your borders.
Step 6: Click All at the left side of the window.
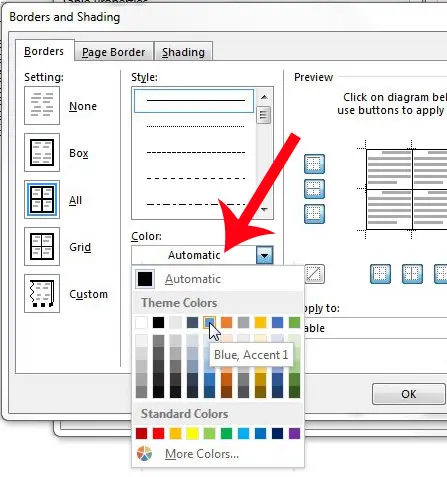
Step 7: Click the drop-down menu under color, then click the color you want to use for the table.
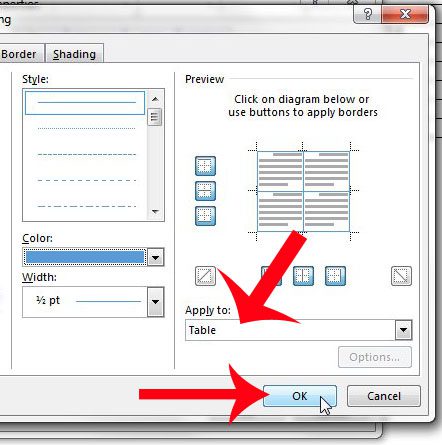
Step 8: Make any additional changes to the style of the table border or the line width, confirm that Table is selected under the Apply to option at the right side of the window, then click the OK button.
Step 9: Click the OK button at the bottom of the Table Properties window, then your selected color will be applied to the table.
If you are trying to change the color of your table’s background instead, then the next section will show you how.
How to Change Table Background Color in Word 2013
The steps in this section are pretty similar to the ones that we used to change the border, or gridline, color in our table.
More Information on How to Change Table Color in Word
You can also change the table color and the background color in newer versions of Word as well, but the process is slightly different. For example in Word for Office 365, after you click inside the table you will choose the Table Design tab, then click the Borders button and choose the Borders and Shading option. Then you will see the window we described above where you can make your color adjustments. All of the instructions above assume that you want to apply the same border color or background to the entire table. If you only want to apply it to one cell you can click the Apply to dropdown at the bottom right of the Borders and Shading window, then select the Cell option. If you are looking to change the appearance of your table in Word, but wish to adjust something other than the border color or the background color, then check out the other options on the Design tab and the Layout tab under Table Tools. There you will find a variety of other options to customize your table, including some existing styles and theme colors that can make it much simpler to create an appealing table without a lot of manual formatting. Do you want to customize your table even further? Learn how to add spacing between table cells to give a unique appearance to your table.
Related Guides
To change the cell background color or border color in Docs you will need to select the table, then click the Background color or Border color button and choose a new option. You can read this guide for more information. Once you have the Borders and Shading dialog box open in the steps above you can click the Styles drop down list and select borders styles from the selection they have. There are quite a few options here, so you can probably create the specific borders that you are looking for via a combination of the styles, color, and width options on this menu.
- Select the table cell(s) to modify.2. Click Layout under Table Tools.3. Choose the Properties option in the ribbon.4. Click the Borders and Shading button.5. Select the Shading tab at the top of the window.6. Click the Fill drop down arrow, then click the desired color.7. Click OK to apply the changes when you’re done.
After receiving his Bachelor’s and Master’s degrees in Computer Science he spent several years working in IT management for small businesses. However, he now works full time writing content online and creating websites. His main writing topics include iPhones, Microsoft Office, Google Apps, Android, and Photoshop, but he has also written about many other tech topics as well. Read his full bio here.
