Different companies and learning institutions often have their own style guidelines when it comes to creating documents. Whatever the reasoning is behind it, many students and employees are required to learn how to use those guidelines when they are creating a document. If you are using Word 2010 to write documents that must follow these guidelines, then it is helpful to change the default settings for the Normal template (Word 2010’s default template) so that any document that you create will be formatted to the necessary specifications. If one of those specifications is line spacing, then you can follow the steps below to learn how to set double spacing as the default in Word 2010.
How to Set Double Spacing as Default in Word 2010
Our guide continues below with more information on changing to double spacing by default in Word 2010, including pictures of these steps.
How to Change Default Word 2010 Spacing to Double Space (Guide with Pictures)
While this article focuses specifically on double-spacing, you will be on a menu where you can select your preferred default spacing from a list of options. If you need to change Word 2010’s default line spacing and don’t want to use the double-spacing referred to in this article, simply select the option that you prefer instead. Additionally, if you want to set a default double spacing option in a different template, select that option instead of the Normal template.
Step 1: Launch Microsoft Word 2010.
Step 2: Click the Home tab at the top of the window.
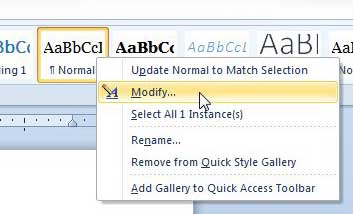
Step 3: Right-click the Normal style in the Styles section of the ribbon, then click the Modify option.
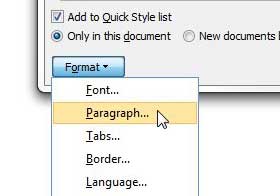
Step 4: Click the Format button at the bottom of the window, then click the Paragraph option.
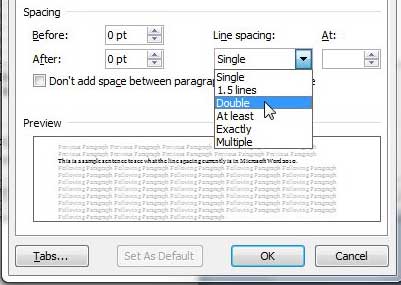
Step 5: Click the drop-down menu under Line spacing, then click the Double option. Click the OK button to close this window.
Step 6: Check the circle to the left of New documents based on this template, then click the OK button.
You can continue reading below for more information on working with the line spacing settings in Microsoft Word documents.
What Other Line Spacing Options Can I Change in Word 2010?
While you have the Paragraph window open in Microsoft Word 2010 you will see that there are a handful of line and paragraph spacing options that you can use. Our guide focuses on adjusting the default line spacing setting in Word 2010, but if you simply want to change line spacing for the current document, then you can accomplish that here, too. For example, if you want double spaced lines in the current document, or you want to select line spacing options that you don’t need to apply for every future new document, then you would select a line spacing value from the Line spacing drop-down menu. Once the settings are correct then you would simply need to click the OL button rather than changing anything default. Aside from switching between single spacing and other line spacing options, you will also note that there are fields labeled “Before” and “After.” If you change these settings you can add extra space before or after your paragraphs. This is a line spacing option that can be difficult to troubleshoot if things don’t look quite right in your document, or if you seem to have extra spacing or a blank line between paragraphs that you can’t remove.
More Information on How to Change the Default Line Spacing in Word 2010 to Double Spacing
The steps in this article show you how to switch your document so that it is double spaced, then we change the normal template in Word 2010 so that it becomes the new default spacing. Another option that you could use to change the default line spacing is to select the Home tab at the top of the window, then click the small Paragraph Settings button at the bottom-right corner of the Paragraph group in the ribbon. There you will see the Paragraph dialog box that we used in the previous section, where you can choose an option from the Line spacing drop down menu. Once you are finished click the Set as Default button, choose the All documents based on the Normal template option, then click OK. In the Paragraph section of the ribbon on the Home tab there is a Line and Paragraph Spacing button that you can also use to change the line spacing in your document. When you click that button in MS Word you will see a drop down list with the following options:
1.01.151.52.02.53.0Line Spacing OptionsAdd Space Before ParagraphAdd Space After Paragraph
If you click one of those options then anything you type into the document afterward will reflect that setting. However if you have selected paragraphs, or the entire document, then that selection will update to reflect the setting that you chose. If you work on multiple computers and need to carry around documents, then a flash drive is very helpful. Click here for an affordable 32 GB flash drive that will fit almost all of your school or work documents with ease. Learn how to change the default file type in Word 2010 if you need to create documents in a different format than .docx.
Additional Sources
After receiving his Bachelor’s and Master’s degrees in Computer Science he spent several years working in IT management for small businesses. However, he now works full time writing content online and creating websites. His main writing topics include iPhones, Microsoft Office, Google Apps, Android, and Photoshop, but he has also written about many other tech topics as well. Read his full bio here.
You may opt out at any time. Read our Privacy Policy


