Learning how to convert from MM to inches in Excel 2013 is a handy skill to have if your work or school commonly puts you in situations where you have spreadsheets containing measurements that are in the wrong units. Excel’s CONVERT formula can resolve this problem quickly, allowing you to get your data into more useful units. The CONVERT formula also has the added benefit of keeping your original data intact, in case you need the measurements in their original format later. But you can elect to hide your rows or columns with the original data if you think it could create confusion. Hiding is preferable to deletion in this situation, as it will still leave the data intact for the formula.
How to Convert MM to Inches in Excel
Our article continues below with additional information on how to convert mm in Excel, including pictures of these steps. Find out how to switch from 1 inch margins in cm in Word by making a change to the settings in the application.
Convert Millimeters to Inches in Excel 2013 (Guide with Pictures)
This article is going to show you how to take data that is stored in your spreadsheet as millimeters and convert it to inches. It will take advantage of the CONVERT formula in Excel 2013, which is something that has the ability to convert from a lot of different units of measurement. You can learn more about the CONVERT formula here.
Step 1: Open the spreadsheet containing the MM units that you want to convert.
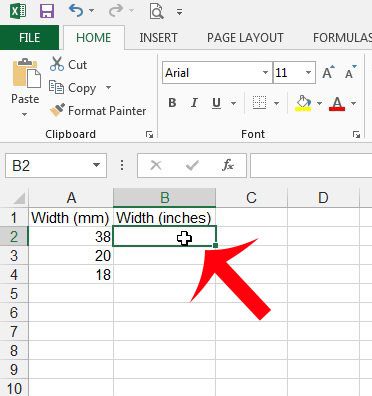
Step 2: Click inside the cell where you want to display the converted value.
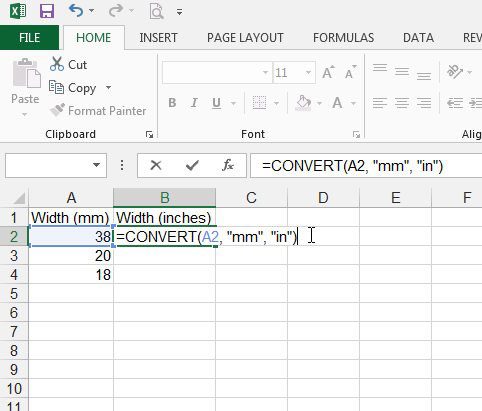
Step 3: Type =CONVERT(XX, “mm”, “in”) into the cell. XX is the location of the MM value that you want to convert.
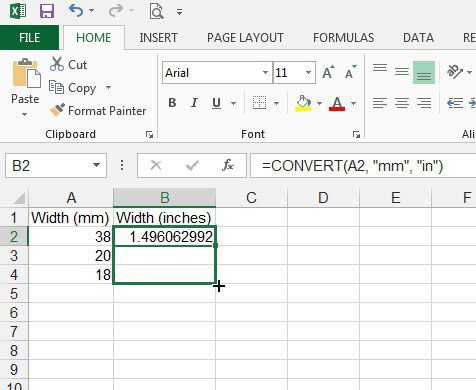
In the example image below, the cell I want to convert is cell A2, so my formula would be =CONVERT(A2, “mm”, “in”) You can then apply your formula to other cells in the column by clicking the handle at the bottom-right corner of the cell, then dragging it down. Excel will automatically populate the selected cells with the formula, and will update the target cell relative to the original formula. So, for example, the formula in cell B3 would be adjusted to =CONVERT(A3, “mm”, “in”) Now that you know how to use the inch millimeter converter in Microsoft Excel you will be able to perform inch to mm calculation right in the cells where you want to display that information. You may notice, such as in my screenshot above, that you are seeing a lot of decimal place values. You can modify the number of displayed decimal places by right-clicking a cell, choosing Format Cells, then clicking Number and specifying the desired number of decimal places. Note that the values in inches are being displayed as a formula. If you copy and paste those values to another location, you might run into an issue. You can resolve this by pasting as a value instead of a formula. If you select the Paste button on the Home tab you will see that option among the different paste actions. You can use a similar function in Excel if you want to convert a unit in the opposite direction. Simply enter the function as described above, but switch the unit of measurement around. So, for example, you would enter this into your Excel cell to go from millimeters to inches – =CONVERT(A3, “in”, “mm”). If you wanted to use this formula to do an mm to inch conversion without referencing a cell, then you could use =CONVERT(360, “in”, “mm”), for example, if you wanted to go from 360 mm to inches. An inch to mm conversion would work the same way, you just need to swap the “in and “mm” parts of that formula. This will also work in other versions of Excel, such as Microsoft Excel for Office 365. There are a lot of other useful formulas in Excel 2013, such as the average formula. This is a quick way to find the average value of a group of cells with a minimal amount of work.
Additional Sources
After receiving his Bachelor’s and Master’s degrees in Computer Science he spent several years working in IT management for small businesses. However, he now works full time writing content online and creating websites. His main writing topics include iPhones, Microsoft Office, Google Apps, Android, and Photoshop, but he has also written about many other tech topics as well. Read his full bio here.


