The iPhone also has a limited amount of storage space, which can leave you looking for ways to remove files and increase your available storage space. One way that you can accomplish this is to start removing unnecessary files from the device. To empty trash on the iPhone you can open the Photos app, choose the Albums tab, select Recently Deleted, tap Select, then Delete all. By completing those steps you will empty the “Recently Deleted” album in the Photos app, which lets you get back the storage space that those unwanted pictures were using. Our guide below will discuss more about emptying trash on the iPhone, including some other places that you can check for files that might currently be in the trash and taking up space.
How to Empty the Photos App’s Recently Deleted Folder
Our guide continues below with additional information on emptying trash on the iPhone, including pictures of these steps.
How to Empty Picture Trash on an iPhone 13 (Guide with Pictures)
The steps in this article were performed on an iPhone 13 in iOS 15.2.1. These steps will also work on many other iPhone models in most recent versions of the iOS operating system. Note that when you delete iPhone photos in this manner you are permanently removing deleted files from the Recently Deleted photos folder.
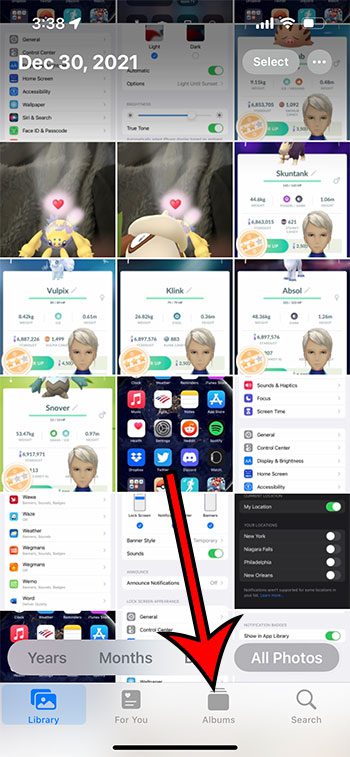
Step 1: Open the Photos app on your iPhone.
If you can’t find it you can always swipe down on the Home screen to open Spotlight Search, then type “photos” into the search field and choose the Photos app from the list of results.
Step 2: Choose the Albums tab at the bottom of the screen.
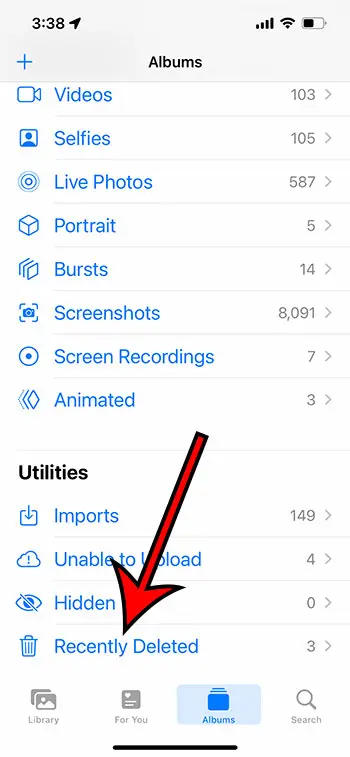
Step 3: Scroll to the very bottom of the screen and select the Recently Deleted option.
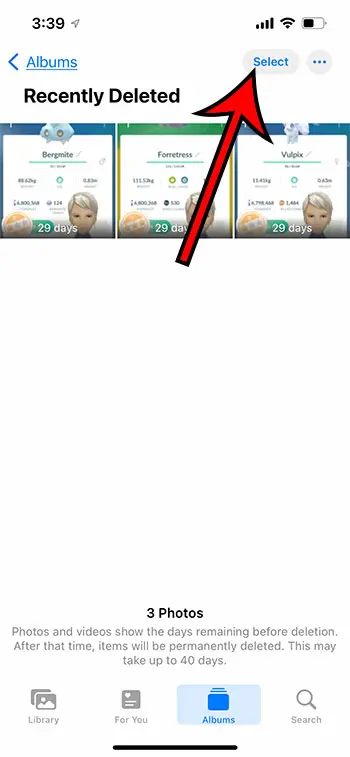
Step 4: Tap the Select button at the top-right corner of the screen.
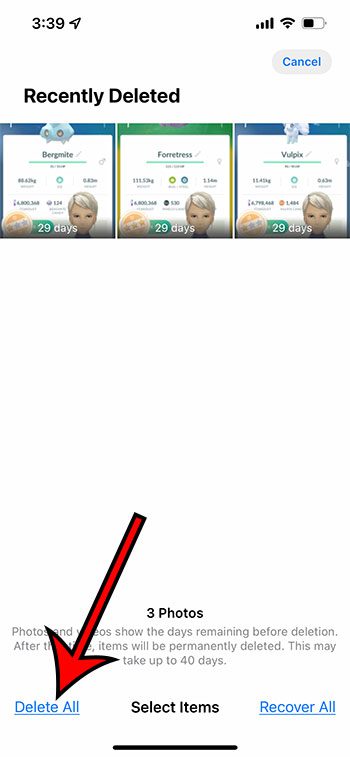
Step 5: Touch the Delete All button at the bottom-left corner of the screen.
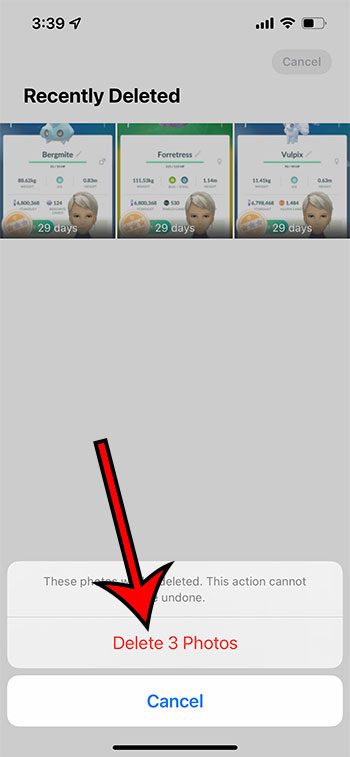
Step 6: Tap Delete XX Photos to confirm that you wish to remove these pictures from your device.
Note that this is a permanent deletion, so you won’t be able to recover these files after you press that confirmation button. It can take a few moments for the available storage to update, especially if you are deleting a lot of pictures from this album. If you don’t manually empty the recently deleted folder in the Photos app then the pictures will automatically delete on their own after 30 days. There is a countdown on each picture in that folder to indicate how much time it has left before it is deleted. Emptying the trash in the Photos app isn’t the only place where you can regain some storage on your iPhone. Another place that you can look is the Mail app, especially if you are often deleting emails from your inbox.
How to Empty Trash in the iPhone’s Mail App
If you actively use your email account on the Internet then you probably get a lot of spam and junk emails. While unsubscribing from these emails can be helpful in reducing email clutter, you still may be deleting a lot of messages from your inbox. It’s possible that this is taking up a lot of space on your iPhone, too, so you might be interested in emptying your email trash as well. If you have multiple email accounts on your iPhone then you will need to repeat these steps for each email account for which you wish to empty the trash. Another place where you might want to delete some trashed files is the iPhone’s Files app.
How to Empty the Trash in the Files App on an iPhone
An app that you may not be as familiar with on your iPhone is one that is simply called “Files.” This is where you can find the files that you have saved to your iPhone, such as ones that you have downloaded in a Web browser or from your email account. As you would expect, this can be a location where you end up accumulating a lot of unneeded files as well. If you are just familiarizing yourself with the Files app then you can delete files here by tapping and holding on to them, then selecting the Delete option. One other location where you can check for and empty the trash is the iPhone’s default “Notes” app.
How to Empty the Trash in the iPhone Notes App
I use the Notes app on my iPhone all the time, and it’s where I usually go when I need to find a piece of information that I’ve forgotten. But heavy usage of this app can easily create a lot of trash, which could be taking up space ony our device. You can use these steps to empty the Notes trash. Continue reading below for additional discussion on emptying iPhone trash, including some additional things you can do to increase available storage.
More Information On Ways to Empty iPhone Trash and Increase Storage
Once you have emptied the trash folder of the Mail app, Notes app, and Photos app you will have hopefully freed up some storage on the device. But once you empty iPhone trash you might still need more storage space. Some of the best places to look involve the apps that are installed on the device. You’ve likely installed some utility apps and games that you aren’t using anymore, which could be taking up a considerable amount of space. You might even have some default apps, like GarageBand, that you don’t use and can easily get rid of. To delete an app on the iPhone 13 you need to tap and hold on the app icon, choose Remove App, then Delete App. You can always re-download an app from the App Store if you decide that you want it back later. Another place to check is the streaming apps that you have installed like Netflix, Hulu, Spotify, and others. Many of these apps will offer ways for you to download files to the device so that you can watch or listen to them when you don’t have a good internet connection. The exact steps for deleting these downloads in those streaming apps will vary, but you will typically need to go to a Downloads folder then select and delete the files that you don’t need anymore.
Conclusion
Hopefully, these steps have provided you with methods for emptying your iPhone trash and freeing up some storage space on your iPhone. Due to the limited amount of storage space on many iPhone models, it’s a bit more crucial to manage the storage space by removing files that we don’t need. Searching for the trash in those apps is a great place to start because it involves files that you have already decided that you don’t want or need, so you are simply going the extra step to permanently delete those files and get back some of that precious iPhone storage space.
Additional Sources
After receiving his Bachelor’s and Master’s degrees in Computer Science he spent several years working in IT management for small businesses. However, he now works full time writing content online and creating websites. His main writing topics include iPhones, Microsoft Office, Google Apps, Android, and Photoshop, but he has also written about many other tech topics as well. Read his full bio here.
You may opt out at any time. Read our Privacy Policy

