Occasionally you might notice a performance issue when you are using the Spotify app. This can happen if your Internet connection speed dips really low, or if the connection disappears entirely. But it might also happen because your computer’s processor is struggling to decode the audio stream from Spotify. One potential solution to this problem involves enabling a setting in the Spotify menu called hardware acceleration. On some computers this can help the Spotify app perform better, as it is using more of the resources on your computer to deliver an improved experience. Conversely, if you have previously enabled hardware acceleration and are finding that Spotify isn’t running well, you might want to disable it to see if the app works better without it. You can continue below to see where you can find Spotify’s hardware acceleration setting.
How to Change Hardware Acceleration Spotify Settings
Our article continues below with additional information on enabling or disabling hardware acceleration in Spotify, including pictures of these steps.
New Method – How to Turn Hardware Acceleration On or Off in Spotify
The steps in this section were performed in Windows 10, using the most current version of the Spotify desktop application available at the time of writing. This method has been relatively similar for a while, but access to the Settings menu has moved around a bit. Note that it won’t matter if you are a Spotify Premium user or not.
Step 1: Launch the Spotify app on your desktop or laptop computer.
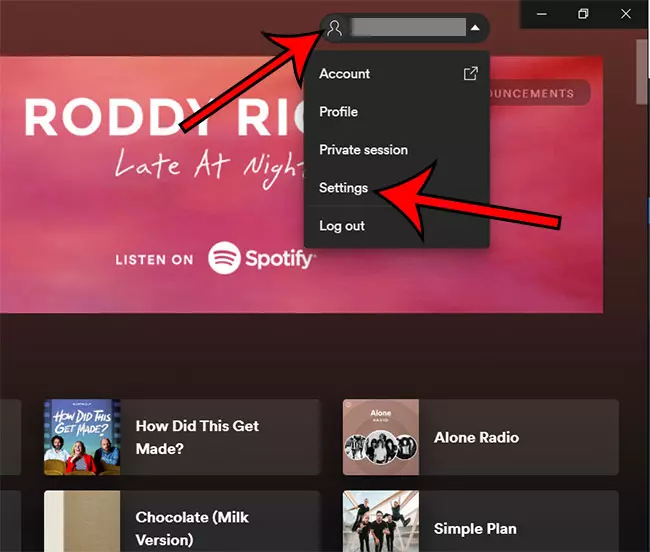
Step 2: Select your username at the top right of the window, then click the Settings option.
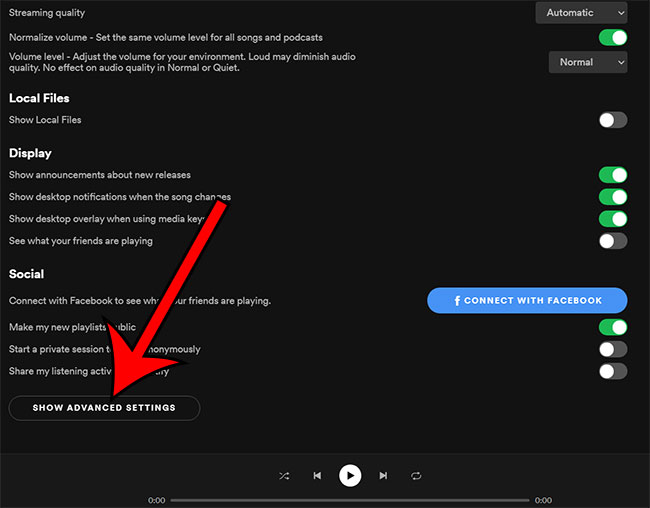
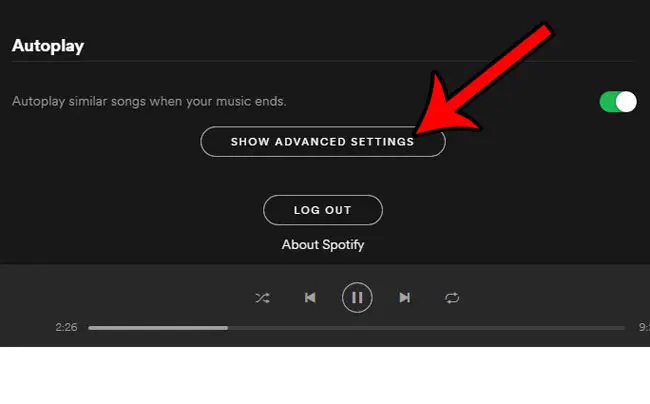
Step 3: Scroll down to the bottom of the menu and click on the Show Advanced Settings button.
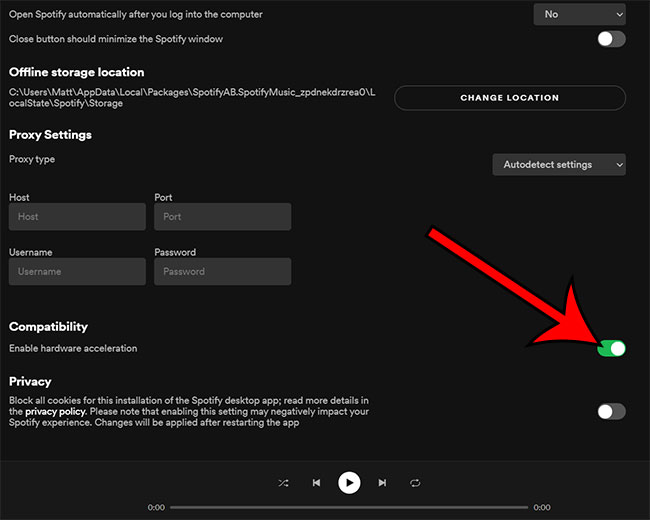
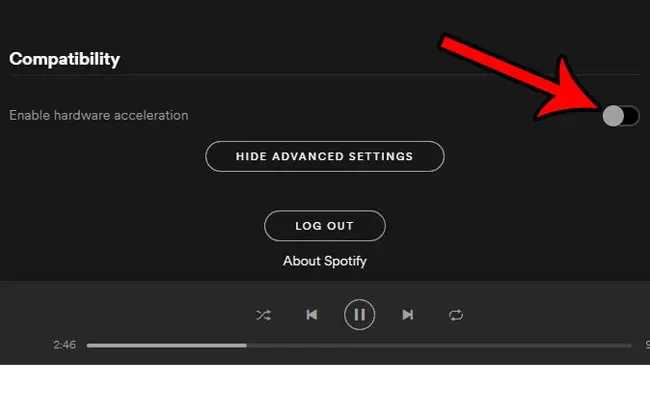
Step 4: Scroll to the Compatibility section, then click the button to the right of Enable hardware acceleration.
The next section describes how to turn this option on or off in older versions of the Spotify app. Otherwise you can skip that section and learn more about using this feature.
Old Method – How to Toggle the Hardware Acceleration Setting in Spotify (Guide with Pictures)
The steps in this section were performed in the Spotify app on a Windows 7 computer, using an older version of the Spotify desktop app. . Note that hardware acceleration can be an improvement to your Spotify usage experience on some computers, while it can actually make it worse on others. If you are experiencing a performance issue with the Spotify app, then toggling this switch might help. However, if the app experience becomes worse, then you will want to revert to the setting that was superior. Step 1: Launch the Spotify app.
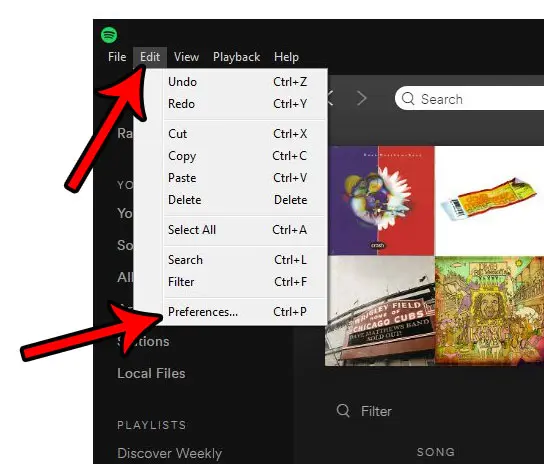
Step 2: Click the Edit button at the top-left corner of the window, then click the Preferences option. Step 3: Scroll down to the bottom of the menu at the center of the window, then select the Show Advanced Settings option. Step 4: Scroll to the bottom of this menu again, then click the button to the right of Enable hardware acceleration. Hardware acceleration is turned on when the button is green. Note that you will need to restart Spotify for your hardware acceleration changes to go into effect. A lot of other applications on your computer have hardware acceleration options, too. For example, you can adjust the hardware acceleration setting in Google Chrome if you are experiencing suboptimal performance in the browser as well.
More Information on How to Enable or Disable Hardware Acceleration in Spotify
The ability to let applications use your computer hardware to increase performance is not specific to Spotify. Many other applications, such as Google Chrome or Adobe Photoshop, have similar settings. If you find that hardware acceleration improves your Spotify experience, then you may want to consider checking for a similar setting in other applications where you are seeing performance declines. Spotify is a great application for music lovers, but it does have some features that you may not like. Luckily, the software has the option to enable or disable hardware acceleration. If your computer’s battery life is being drained too quickly by Spotify and you want to save some power, then this setting could be one that improves your experience not only with Spotify, but with your computer as a whole. The Spotify desktop application is one of the most popular music streaming applications, and with good reason! It’s great for listening to your favorite artists without needing an internet connection. The only downside to this is that it can often use a lot of system resources, making it so that you computer may become slow or even freeze up on occasion. One way to prevent these issues from happening as often is by disabling hardware acceleration in the Spotify settings menu using the steps that we outlined in previous section.
What is Spotify hardware acceleration?
When you’re playing a song on Spotify, it’s loading the audio file to your computer and making sure that all of the sound is coming through in high resolution. If hardware acceleration is turned off, then this process takes up more resources from your system and might take slightly longer than if hardware acceleration was left on at its default setting. Since there are some negative aspects associated with turning off hardware acceleration, our recommendation would be for you to leave it enabled when possible although either option will work just fine as long as they don’t result in any major issues with playback or performance. Some people have been reporting problems where they’ve disabled their CPU usage by using certain apps such as Energy Saver which can cause playback issues during extended periods of playback.
How Does Hardware Acceleration Work in Spotify?
When the hardware acceleration feature is enabled in Spotify, it will take the processing of audio signals off your computer’s CPU and assign it to a different processor. This is sometimes referred to as “offloading.” The design goal for hardware acceleration in Spotify was that it should not consume any more battery life or create noticeably “lousier” sound quality than if you were using software-only methods for decoding the music, which does its work on the same central processor (CPU) chip. We’re pretty happy with how this turned out: we found little increase in battery consumption when running tests without AIR, although there are some minor tradeoffs such as needing slightly higher bitrates at low latencies due to shifts in where computations happen.
Why would you want to use it?
The hardware acceleration feature is an option that allows you to use your computer’s processing power and graphics card for decoding audio. This can result in better sound quality, less battery consumption (although this varies based on the specific system), or enabling access to higher-quality streams due to lower latency requirements. Note: if you previously had a Creative Sound Blaster X-Fi Titanium HD installed then it will be disabled when activating the Spotify hardware acceleration program setting. You may want to enable hardware acceleration when using low bandwidth internet connections such as satellite, mobile networks, or through wireless Internet tethering with devices like phones, tablets, etc., which have much slower download speeds than wired broadband connections like DSL/cable modem service from your phone company or internet service provider.
Additional Sources
After receiving his Bachelor’s and Master’s degrees in Computer Science he spent several years working in IT management for small businesses. However, he now works full time writing content online and creating websites. His main writing topics include iPhones, Microsoft Office, Google Apps, Android, and Photoshop, but he has also written about many other tech topics as well. Read his full bio here.
You may opt out at any time. Read our Privacy Policy
