Learning how to show the ruler in Word 2013 can be helpful when you open a document to edit it, but find that no ruler is being displayed. You can have a ruler visible both above and to the left of your document in Word 2013, depending upon which view you are currently using. These rulers are helpful when you are visually formatting your document, so their absence can make that difficult when you are accustomed to using them. Our guide below will show you how to display the ruler in Word 2013, and also provides a helpful chart that identifies which rulers are visible in each different view.
How to Show the Ruler in Word 2013
Our article continues below with additional information on how to add ruler in Word 2013, including pictures of these steps.
How to Display the Ruler in Word 2013 (Guide with Pictures)
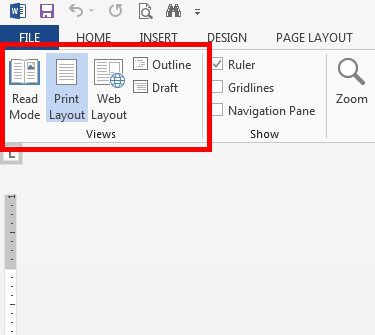
The steps in this article will teach you how to show the ruler in Word 2013. Note that the ruler that is shown with your document can vary depending upon the view that is currently selected in the program. You can adjust the View by clicking the View tab at the top of the window, then selecting one of the options in the Views section at the left side of the ribbon. When you have completed the steps in this guide, then the visibility of the rulers will be: You can use these steps and images to add the ruler from the View tab to your document window.
Step 1: Open your document in Word 2013.
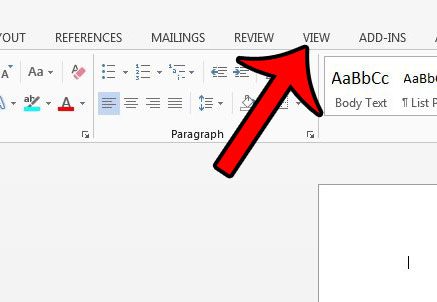
Step 2: Click the View tab at the top of the window.
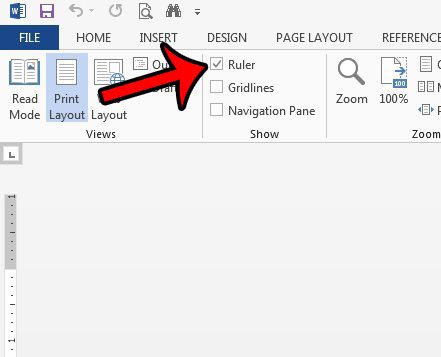
Step 3: Check the box to the left of Ruler in the Show section of the ribbon.
For additional information on showing or hiding the ruler in Word, continue reading below.
Can I Have a Horizontal and Vertical Ruler in Word 2013?
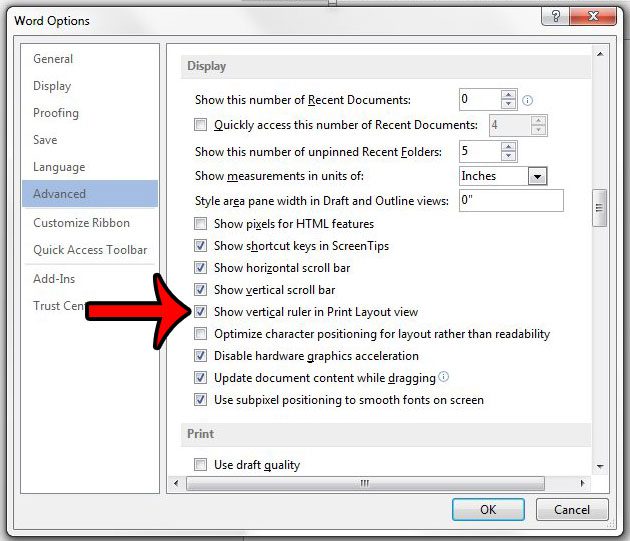
Yes, it is possible for you to display both of these rulers when you are editing a document, provided that you are in Print Layout view. You can check this by choosing the Print Layout option in the Views group on the View tab. As indicated in our tutorial above, you can add the horizontal ruler by going to View > Show Ruler. The rulers should be shown on the screen when the Ruler check box has a check in it. Typically the vertical ruler is displayed as well, but if not, then you need to complete the following step. If you want to display a vertical ruler in Word then click the File tab, click the Options button, choose the Advanced tab, then check the box to the left of Show vertical ruler in Print Layout view. We expand on this with an image of the menu in the next section.
More Information on How to Get Ruler on Word 2013
If the vertical ruler is not visible in Print Layout view after following the steps above, then you can enable it by going to File > Options > Advanced then checking the box to the left of Show vertical ruler in Print Layout view. The ruler has a number of uses in conjunction with a document, so being able to understand how to show the horizontal or vertical ruler in Word 2013 can give you a better understanding as to the different views that are available, while also familiarizing yourself with some of the menus and settings found within the program. For example, you can delete a header in Word 2013 by manually adjusting the size of the header on the vertical ruler in the Print Layout. The Show group on the View tab in Microsoft Word 2013 also has options that allow you to display gridlines and a navigation panel. The gridlines are reminiscent of those used in Microsoft Excel, but are going to be less useful for many people writing documents. The navigation pane provides an easy way to navigate through headings and pages if you use headings to organize the sections of your documents. In earlier versions of Microsoft Word there used to be a View Ruler icon above the right vertical scroll bar. However, newer versions of Microsoft Office have removed that option and you will need to use the option on the View tab to complete this action. You can also configure other display options for your document as well. For example, you can show a text boundary in Word 2013 that lets you see what part of the document can contain content.
Additional Sources
After receiving his Bachelor’s and Master’s degrees in Computer Science he spent several years working in IT management for small businesses. However, he now works full time writing content online and creating websites. His main writing topics include iPhones, Microsoft Office, Google Apps, Android, and Photoshop, but he has also written about many other tech topics as well. Read his full bio here.
You may opt out at any time. Read our Privacy Policy


