Many users dislike the ribbon for various reasons, one of which is the amount of space that it occupies at the top of the screen. Fortunately this is something that you can adjust by electing to hide the ribbon when you are not using it. Our tutorial below will show you three separate ways that you can hide, or minimize, the ribbon in Word 2010.
Minimizing the Ribbon in Microsoft Word 2010
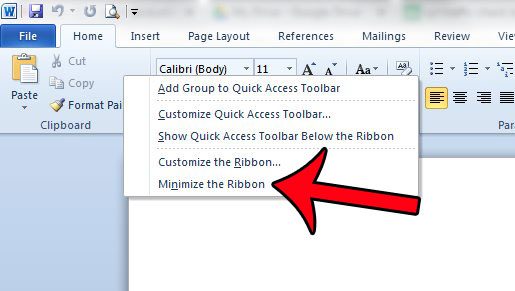
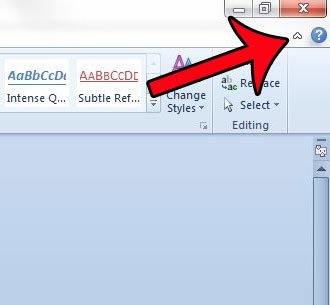
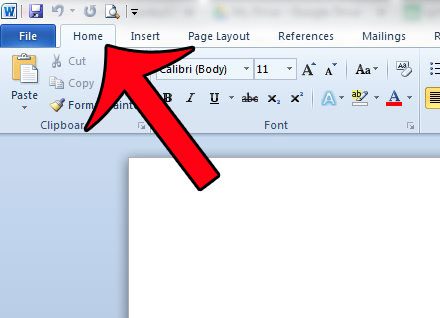
The steps in this article are going to show you how to hide the Office ribbon from view in Microsoft Word 2010. The ribbon will still appear when you click one of the navigational tabs at the top of the window, but will go back to being hidden once you click inside of your document. Note that this same method can also be used to hide the ribbon in other Microsoft Office programs, such as Microsoft Excel and Microsoft Powerpoint. Step 1: Open Microsoft Word 2010. Step 2: Right-click somewhere on the ribbon. Step 3: Click the Minimize the Ribbon option. Additionally, you can hide the ribbon by clicking the arrow at the top-right corner of the screen, next to the ? icon. Clicking that arrow again will restore the full Office ribbon. As a final method for hiding the ribbon, you can also double-click on the active tab at the top of the window. For example, in the image below, I can double-click on the Home tab to minimize the ribbon. Are you hiding the ribbon because you want to maximize the amount of space dedicated to the document? You can also hide the ruler in Word 2010 to clear away another feature that you might not be using. After receiving his Bachelor’s and Master’s degrees in Computer Science he spent several years working in IT management for small businesses. However, he now works full time writing content online and creating websites. His main writing topics include iPhones, Microsoft Office, Google Apps, Android, and Photoshop, but he has also written about many other tech topics as well. Read his full bio here.
You may opt out at any time. Read our Privacy Policy


