Google Slides is a great application to use when you need to make a slideshow or presentation for work or school. It’s simple to use, similar to Powerpoint, and the fact that it automatically saves your presentations to Google Drive helps to ensure that you can access them from anywhere with an Internet connection. Occasionally your slideshows will be very long, or need to be printed out. In these situations it can be tough to remember where you are, or you may have trouble getting a presentation back into the correct order if a printed version somehow winds up in the wrong order. Fortunately you can add slide numbers to help resolve these potential problems.
How to Number Slides in Google Slides
Our article continues below with additional information on inserting slide numbers in Google Slides, including pictures of these steps.
How to Add Page Numbers in Google Slides Presentations (Guide with Pictures)
The steps in this article were performed in Google Chrome, but should work in other desktop Web browsers as well. Note that this setting is only applied to the presentation that is currently opened. This will not add slide numbers to any existing presentations, nor any future ones that you create.
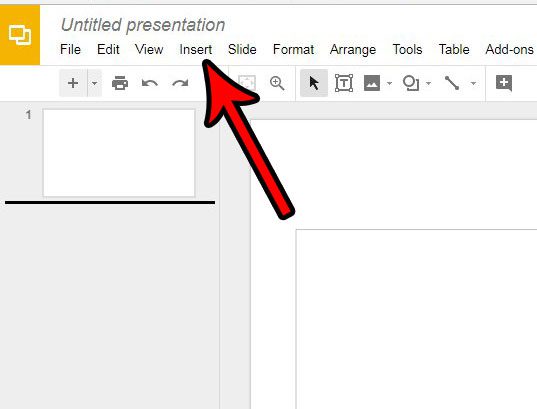
Step 1: Sign into your Google Drive at https://drive.google.com/drive/my-drive and open the presentation to which you want to add the slide numbers.
Step 2: Click the Insert tab at the top of the window.
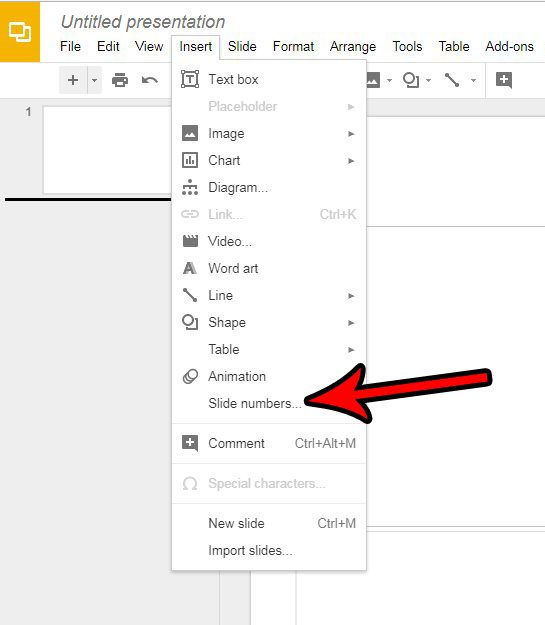
Step 3: Select the Slide numbers item near the bottom of the menu.
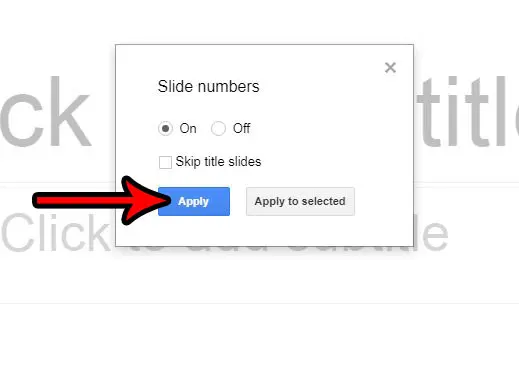
Step 4: Choose whether or not you wish to add the slide numbers to title slides, then click the blue Apply button.
Note that there is an “Apply to selected” option if you only want to add slide numbers to some of the slides, instead of all of them. If so, then you will need to select those slides prior to step 2 above. You can add page numbers in other Google productivity applications as well. For example, this article will show you how to add page numbers in Google Docs for documents that you create in there.
How to Remove Slide Numbers in Google Slides
While many of the other formatting settings that you add or apply to your presentation can be removed by simply clicking them again, these numbers on slides work a little differently. You will need to return to the Slide numbers pop up window and click the Off button, then click the Apply button to remove numbers that had been previously added to the slideshow.
More Information on How to Add a Google Slides Page Number to Each Slide
Slide numbering in presentation software like Microsoft Powerpoint and Google Slides is useful to you as the presenter, and to your audience. It can be difficult to find a way to easily identify specific slides when your audience asks questions, or when you are editing or collaborating with others. The slide numbers in Google Slides appear at the bottom right corner of each slide. You can choose to skip a slide by right clicking on that slide, then selecting the “Skip slide” option. However, the slide numbering will not adjust to accommodate this change. So, for example, if you elect to skip the fourth slide in the presentation then the numbering will jump from three to five in the printed or presented version of the slideshow. You can remove all of your slide numbers by going to Insert > Slide numbers then choosing the Off option. One of the options on the slide numbering window is to “skip title slides.” If you choose that option, Google slides will not include page numbers on any slide that uses the title layout. You can change the layout of a slide by selecting the slide from the column at the left side of the window, then clicking the Layout button in the toolbar above the slide. There you can select from any layout for the document, such as section header, one column text, main point, and many others. While other Google apps like Google Docs or Google Sheets give you some more freedom when adding page numbers to a document, such as placing them in different parts of the header or footer, Google Slides will only add a page number to the bottom right corner of the slide. The Apply to Selected option on the page numbers menu is interesting, in that it allows you to choose which slides are numbered. So if you only wanted to add numbers to a couple of slides you could select them (by holding down the Ctrl key on your keyboard as you click each slide) then open the slide numbering window and click the “Apply to Selected” button instead of the “Apply button.” Note, however, that this is going to have the same problem with skipped slides that exists when you are numbering the entire presentation.
Additional Sources
After receiving his Bachelor’s and Master’s degrees in Computer Science he spent several years working in IT management for small businesses. However, he now works full time writing content online and creating websites. His main writing topics include iPhones, Microsoft Office, Google Apps, Android, and Photoshop, but he has also written about many other tech topics as well. Read his full bio here.


