There are a few different ways to make a row bigger in Excel, and we will explore several of them in our tutorial in this article. If you need to make a row bigger for printing reasons, then we recommend checking out this simple guide to Excel printing for some common fixes that improve the printability of your spreadsheets.
How to Increase Row Size in Microsoft Excel 2010 (3 Different Methods)
You have the option of visually making your row bigger, entering a higher value to increase the size of the row, or allowing Excel to automatically resize the row for you. The correct option is situational, so check out all of the different methods of making an Excel 2010 row bigger below. You can visit Microsoft’s website to learn more about resizing columns and rows.
Method 1 – How to Increase Row Size Visually in Excel
Step 1: Open the spreadsheet containing the row that you want to make bigger.
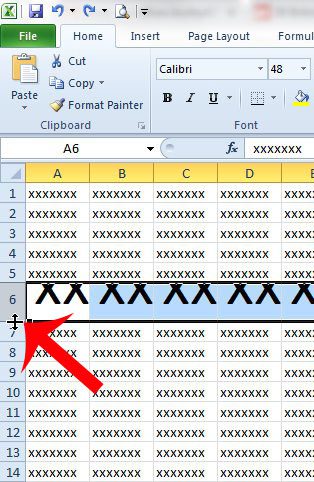
Step 2: Click the border at the bottom of the row number, then drag it down to increase the size of the row. The next section provides steps for another way to accomplish this by using the “Row Height” feature found on the right-click menu.
Method 2 – How to Increase Row Size Numerically in Excel
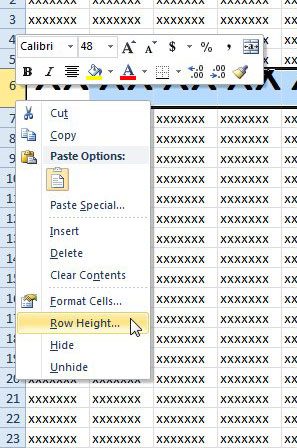
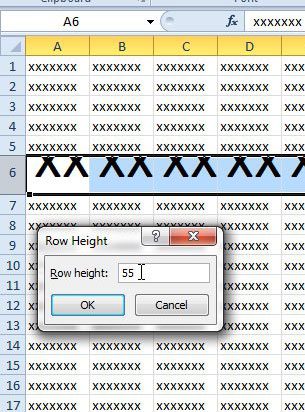
If you are trying to make your rows a very specific height, then using this option to enter a value for the row height might be your best bet. Step 1: Right-click the row that number that you want to make bigger, then click the Row Height option. Step 2: Enter a new value into the field, then click the OK button. Note that this number is the number of pixels, which is a unit of measurement with which most people are not familiar. You may need to experiment with different values before you find the appropriate size for your row. The next section is probably the fastest and easiest way to accomplish this, as it will just require a single double-click.
Method 3 – How to Make Excel Increase the Row Size Automatically
This option will simply require you to double-click on the bottom border of a row. Excel will take care of the rest and expand the row height to fit the data contained within it. If you need to make multiple rows larger and you want to use an automatic option, then check out our guide on how to expand all rows in Excel. Step 1: Locate the row that you want to make bigger.
Step 2: Double-click the bottom border of the row number. Excel will automatically resize the row so that all of the data is visible. Note that it will only automatically resize the row. You may also need to resize columns using similar methods to those in this article. Now that you know how to make a row bigger in Excel you can use this process to increase row sizes when you have multiple lines of data in your cells, or if a formatting change has made you text too large for its current height. Do you want to quickly resize all of your columns? This article offers a quick solution for anyone that wants all of their columns to autofit the data contained within them.
Additional Sources
After receiving his Bachelor’s and Master’s degrees in Computer Science he spent several years working in IT management for small businesses. However, he now works full time writing content online and creating websites. His main writing topics include iPhones, Microsoft Office, Google Apps, Android, and Photoshop, but he has also written about many other tech topics as well. Read his full bio here.
You may opt out at any time. Read our Privacy Policy