While the tool that you need to use isn’t obvious, there is one that can perform this task and give you the result you seek.
Photoshop Outline Selection Guide
Our tutorial continues below with additional information on how to outline a selection in Photoshop, including pictures of these steps. You may need to change the layout of objects in your image pretty often, including layers that contain words. You can read our how to move text in Photoshop tutorial and find out how to reposition it. Adobe Photoshop CS5 is great for a lot of different tasks that you have to perform on your images but, for the majority of people, drawing can be very difficult within the program. This is due to a combination of the lack of accuracy associated with using a mouse and the difficulty in drawing a straight line. Therefore, when you need to draw a rectangular or elliptical shape, including squares and circles, you will find yourself looking for an automated way to do so. Fortunately, Photoshop CS5 includes several selection utilities that you can take advantage of to be able to outline a selection in Photoshop CS5. Combined with the Stroke tool on the Edit menu, you can quickly and accurately generate good shapes without resorting to complicated freehand drawing. Google Slides has a solid set of editing tools, including a way that you can learn how to circle something in Google Slides.
How to Stroke a Selection in Photoshop CS5 (Guide with Pictures)
The stroke feature in Photoshop CS5 is helpful for converting the outline of your selection into a single colored line. While this tutorial will teach you how to outline a square or circular selection in Photoshop CS5, you can apply the same principle to outline any selection that you generate in Photoshop CS5.
Step 1: Begin by opening the image file to which you want to add an outlined selection. If you are creating a file from scratch, launch Photoshop, click File at the top of the window, the click New.
Step 2: If you want to create your outlined selection on its’ own layer, press Shift + Ctrl + N to create a new layer. Otherwise your outlined selection will be drawn on the currently selected layer.
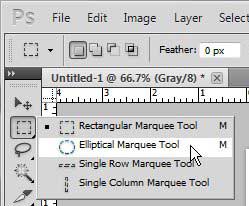
Step 3: Click the Selection tool in the toolbar at the left side of the window.
If you want to use a different selection shape, right-click the Selection tool, then click your desired shape. You can choose between rectangular, elliptical, vertical line or horizontal line options.
Step 4: Click on the canvas, then drag your mouse until you have created your desired selection.
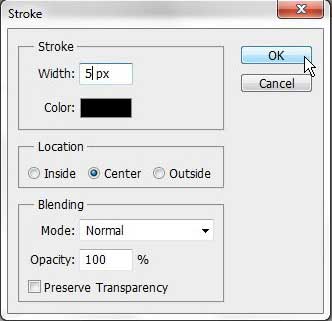
Step 5: Click Edit at the top of the window, then click Stroke.
Step 6: Choose a value for the stroke width, click the box to the right of Color to choose a color for your outlined selection, then choose how you want the outline to be drawn in relation to the selection.
The Inside option will be inside the selection, Outside will be outside of it, and Center is on the selection line. If necessary, choose the Blending mode, opacity and whether or not to preserve transparency. When all of your stroke selections have been configured, click the OK button. Your finished result may vary, but my outlined circle, with a pixel width of 5px, drawn in black on the center of the selection, looks like the image below. If you have created the outlined selection on its own layer, you are able to use the Move Tool at the top of the toolbox to drag your outlined shape to its’ desired location on your image. Now that you know how to outline a selection in Photoshop you can use this to add borders around selections, draw different shapes, and create interesting effects.
After receiving his Bachelor’s and Master’s degrees in Computer Science he spent several years working in IT management for small businesses. However, he now works full time writing content online and creating websites. His main writing topics include iPhones, Microsoft Office, Google Apps, Android, and Photoshop, but he has also written about many other tech topics as well. Read his full bio here.
You may opt out at any time. Read our Privacy Policy


