Learning how to print the outline view in Powerpoint 2010 is a valuable skill for someone that spends a lot of times working with Powerpoint presentations. Many presentations can be incredibly large, and printing out every slide can be both unwieldy and unproductive. But the outline view in Powerpoint 2010 provides a summarized version of your spreadsheet’s information, and printing an outline from Powerpoint 2010 can give you a condensed list of the slides and the information contained on them. While we have previously discussed ways to print out handouts and speaker notes in Powerpoint 2010, one of those options might not be ideal for every situation. Sometimes you want to print out a short summary of the information contained in your slideshow, whether it is for you or your audience. Luckily Powerpoint 2010 also generates an outline from your slideshow information, so you will want to learn how to print an outline from Powerpoint 2010. Generally speaking, an outline will usually be much smaller than if you printed handouts for everyone in your audience, as the outline will only include the text from your slides. This will reduce the amount of paper that you use and will present the bulk of your slideshow information in a format that is easy to manage.
Printing Outlines in Powerpoint 2010
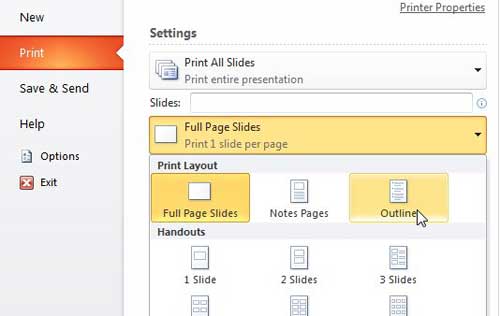
The outline of your slideshow in Powerpoint is something that Powerpoint generates automatically. You do not need to do anything special for the outline to be created. it will take all of the text on each of your slides, then it will organize that information, by slide, into one complete outline document. You can follow the steps below to learn how to print your outline in Powerpoint 2010. Step 1: Double-click your Powerpoint presentation to open the slideshow in Powerpoint 2010. Step 2: Check each slide to ensure that you have included all of your text information, and that everything is spelled correctly. Note that there is a spell check utility available in the Proofing section of the ribbon on the Review tab. Step 3: Click the File tab at the top-left corner of the window. Step 4: Click Print in the column at the left side of the window. Step 5: Click the Full Page Slides drop-down menu at the center of the window, then click the Outline option in the top section.
Step 6: Check the outline document in the preview section at the right side of the window to see what information will be included on the printout. If something is incorrect or does not make sense without also including a video or image to which it refers, then consider revising the text so that it is more helpful in the outline format. Step 7: Click the Print button at the top of the window to print out the outline document.
Summary – how to print an outline view in Powerpoint 2010
Would a slide in your presentation, or even the entire presentation itself, look better in portrait orientation? Learn how to switch to portrait orientation in Powerpoint 2010 and look at your slide shows from a different perspective. After receiving his Bachelor’s and Master’s degrees in Computer Science he spent several years working in IT management for small businesses. However, he now works full time writing content online and creating websites. His main writing topics include iPhones, Microsoft Office, Google Apps, Android, and Photoshop, but he has also written about many other tech topics as well. Read his full bio here.