Powerpoint 2010 has a pretty impressive amount of options when it comes to placing objects in your slideshow. But aside from the variety of items that can be in a Powerpoint file, there are also a number of ways that you can edit, move or position those items. So if you have initially placed a text box in a slide, then you insert an image, you may be wondering how to re-position these objects so that the text box is on top of the image. This is going to take advantage of the layering aspect in Powerpoint, as we are simply going to move the image behind the text box using the steps below.
How to Place a Picture Behind a Text Box in Powerpoint 2010
Our article continues below with additional information on putting a picture behind text in Microsoft Powerpoint, including pictures of these steps.
How to Place a Text Box on Top of a Picture in Powerpoint 2010 (Guide with Pictures)
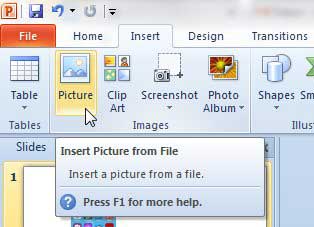
The steps in this article were performed in Microsoft Powerpoint 2010, and assume that you already have the text box and picture in a slide that you want to reposition. If not, then either of those objects can be added by selecting the “Insert” tab at the top of the window, then clicking the appropriate choice from the navigational ribbon.
Step 1: Open the Powerpoint file containing the image and text box that you want to re-position.
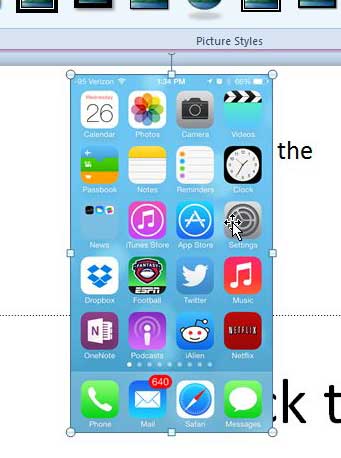
Step 2: Click the picture to select it.
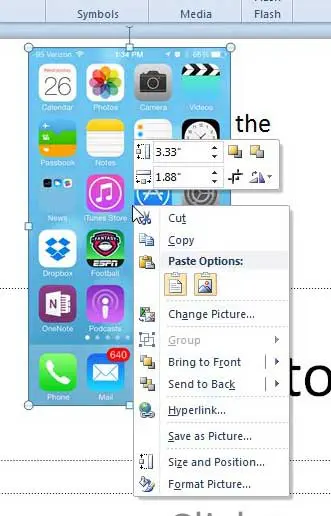
Step 3: Right-click the picture to bring up the shortcut menu.
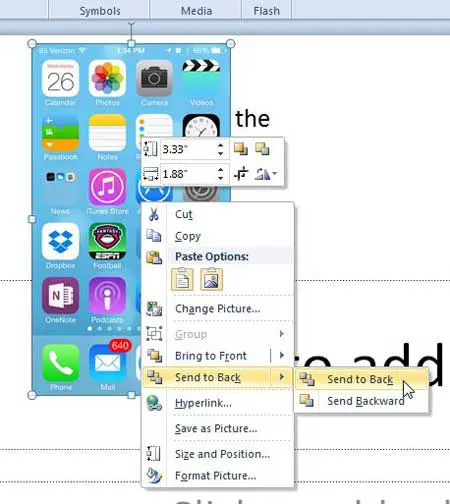
Step 4: Click the Send to Back option, then select Send to Back again.
Your text box should now be visible above your image. You can also use this to position other objects on top of one another, such as a chart, shape, table, or basically anything else that you could insert into a Powerpoint presentation. Note that this is a convenient way for you to add a background picture to slides, such as a corporate logo or simply something that is aesthetically pleasing. While many of the default themes that you can select from the Design tab can really help to make your information look appealing and professional, the addition of relevant images, especially in unique implementations, can help your presentation to stand out.
More Information About How to Put a Picture Behind Text in Powerpoint
This tutorial assumes that your Powerpoint document already has the text box and picture on the slide. If not, then you can avoid adjusting the layers by inserting the picture first by clicking the Insert tab at the top of the window, then clicking the Picture option. You can then click the Text Box option on the Insert tab to place the text box on top of the picture. But if the image and text box are already in your slide, then follow the steps above. The steps in this article were performed in Microsoft Powerpoint 2010, but will also work in newer versions of Microsoft Office as well. or example, everything in the section above will also work in the Microsoft Powerpoint for Office 365 version of the application as well. Another way that you can put a picture behind a text box or other object in your slideshow is to select the picture, click the Home tab at the top of the window, click Arrange, then select the Send to Back option. So if you prefer not to use right-click options then the process would be: Home > Arrange > Send to Back When you open that Arrange drop-down menu you will see that there are a number of other options you can use to adjust the layer order of objects. These options are:
Bring to FrontSend to BackBring ForwardSend Backward
You could use the “Bring Forward” or “Send Backward” options if you have multiple layered objects on a slide and are trying to put something in the middle. They also work as an alternative to put an object on the top or bottom layer if there are only two layered objects. One interesting way that you can incorporate layering is if you want to add text to an image but don’t want to go through the hassle of using an image-editing application like Adobe Photoshop or Microsoft Paint. Simply add the picture to the slide, then insert a text box and adjust it until you have the desired effect. If you find that the text is difficult to read then you may need to adjust the transparency of the image by right-clicking on it and choosing the Format Picture option where you will be able to adjust the image transparency. Or you can select the picture then go to Picture Format > Transparency and choose an option there instead. Would it be easier to share your Powerpoint presentation if it were a video? You can read this article to learn how to turn your Powerpoint file into a video.
Additional Sources
After receiving his Bachelor’s and Master’s degrees in Computer Science he spent several years working in IT management for small businesses. However, he now works full time writing content online and creating websites. His main writing topics include iPhones, Microsoft Office, Google Apps, Android, and Photoshop, but he has also written about many other tech topics as well. Read his full bio here.


