But if you make some changes to your spreadsheet, such as adding or deleting rows, then the page breaks might not line up as well anymore. In fact, there may be several page breaks that are now incorrect. Rather than trying to manually find and change each individual page break, the simpler solution is often to just remove all of the page breaks at once. Our how-to guide below will show you how to get rid of all of your page breaks in Excel 2010.
Clear All Page Breaks in Excel 2010
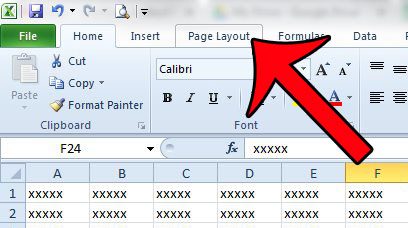
Applying the steps below will remove any page breaks from your spreadsheet that have been inserted manually. Natural page breaks will still occur when data cannot fit on a page. If you want to force all of your columns to fit on one page, then read this article. Step 1: Open the spreadsheet in Excel 2010. Step 2: Click the Page Layout tab at the top of the window.
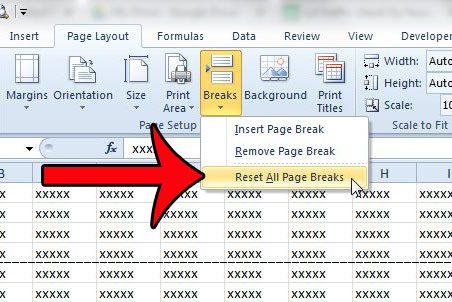
Step 3: Click the Breaks button in the Page Setup section of the navigational ribbon, then click the Reset All Page Breaks option.
You will now be able to print your spreadsheet without applying any of the page breaks that were previously changing the way that the spreadsheet printed. Are you looking for some tips to make your Excel spreadsheets print better? Our Excel printing guide will show you some of the options to change when your documents are not printing as well as you would hope. After receiving his Bachelor’s and Master’s degrees in Computer Science he spent several years working in IT management for small businesses. However, he now works full time writing content online and creating websites. His main writing topics include iPhones, Microsoft Office, Google Apps, Android, and Photoshop, but he has also written about many other tech topics as well. Read his full bio here.
You may opt out at any time. Read our Privacy Policy