Delete Audio from an iPhone Video with Windows Live Movie Maker
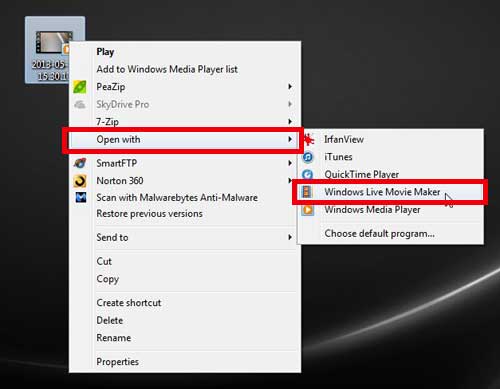
This procedure is going to assume that you already have the video on your computer. If you do not, you can transfer it over through iTunes, or you can upload it to a cloud storage service like Dropbox or SkyDrive. My personal preference is to use Dropbox, because it has an automatic upload feature for pictures and videos. You can learn more about it here. But continue reading below to remove the audio from your iPhone video. Step 1: Right-click your iPhone video, click Open with, then click Windows Live Movie maker.
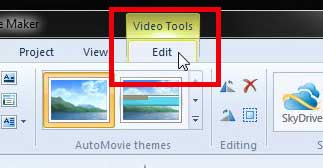
Step 2: Click the Edit tab under Video Tools at the top of the window.
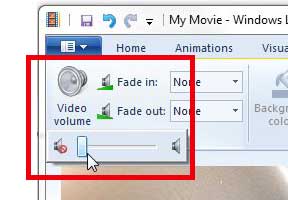
Step 3: Click the Video Volume button in the ribbon at the top of the window, then drag the slider all the way to the left. If you play your video now, you will not hear the audio.
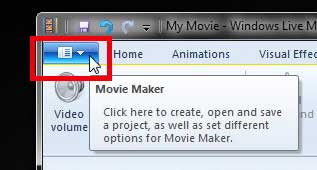
Step 4: Click the Movie Maker tab at the top-left corner of the window.
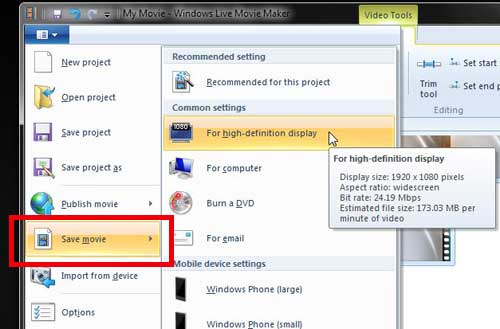
Step 5: Click the Save Movie option, then select the quality of the video file that you want to create.
Step 6: Enter a name for your video into the File Name field, then click the Save button. When you go to play the video file that you just created, there will be no sound. You can also use Movie Maker to rotate your iPhone video, if necessary. Click here to learn how. If you don’t already have Windows Live Movie Maker on your computer, you can download it here. After receiving his Bachelor’s and Master’s degrees in Computer Science he spent several years working in IT management for small businesses. However, he now works full time writing content online and creating websites. His main writing topics include iPhones, Microsoft Office, Google Apps, Android, and Photoshop, but he has also written about many other tech topics as well. Read his full bio here.
You may opt out at any time. Read our Privacy Policy
