You may discover that you need to learn how to remove duplicates in Excel 2010 when you are working with data in a spreadsheet that is difficult to sort or analyze because there are too many instances of the same cell data. While deleting individual rows to remove these duplicates is manageable when it only occurs a couple of times, it can be overwhelming when there are a high number of duplicates. Sometimes when you are creating a spreadsheet in Microsoft Excel 2010, that information is not created from scratch. Whether it is coming from a previous version of a similar spreadsheet, or if you are consolidating information from another location, you might run into some problems with the data contained in the new document. One such problem is multiple records of the same information. Fortunately you can learn how to remove duplicates from an Excel 2010 sheet, which will help to prevent you from generating incorrect data. Removing duplicates from an Excel 2010 spreadsheet is a very useful utility, and you can customize the way that it occurs to ensure that your spreadsheet data is not negatively affected by the data removal.
How to Remove Duplicates in Excel 2010
Our article continues below with additional information on removing duplicates in Excel, including pictures of these steps.
How to Eliminate Duplicates in Excel 2010 (Guide with Pictures)
Manually editing and removing data in Excel 2010 is an unavoidable task. If it is only a small amount of data, then you probably don’t give it a second thought. But when you need to carefully read through a large amount of data and make a large number of changes, it can be a time consuming endeavor. Additionally, needing to make a lot of changes can lead to potential mistakes. And when you consider how difficult it can be to check data records against one another, the process of removing duplicates in Excel 2010 can be challenging. Luckily the dedicated tool is simple to use and effective, so it can really help with this task.
Step 1: Open the Excel spreadsheet containing the duplicates that you want to remove.
Step 2: Highlight the data containing the duplicates that you want to remove.
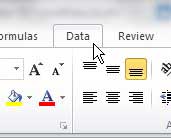
Step 3: Click the Data tab at the top of the window.
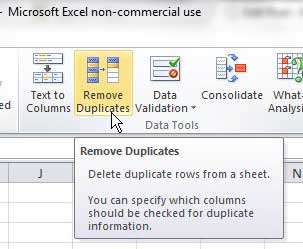
Step 4: Click the Remove Duplicates button in the Data Tools section of the ribbon at the top of the window.
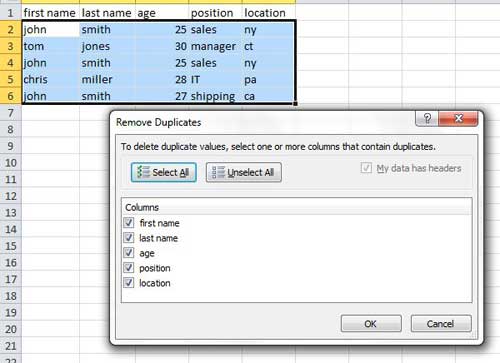
Step 5: Check the columns containing the data that you want to check for duplicates.
For example, in the image below, I want to remove the duplicate entry for “John Smith.” But there are multiple John Smiths, and I only want to remove the duplicate one. So I check all of the columns in the selected data, which will ensure that Excel checks all of the columns before removing a duplicate record. If I only checked the “First Name” and “Last Name” columns, then Excel would delete all but one of the “John Smith” entries, which would actually result in the loss of a unique record.
Step 6: Click the OK button.
Note that Excel will keep the first instance of the data that it finds. So if you wish to keep a specific instance of data in the column, then sort that data appropriately so that the cell you want to keep appears first in the column. If your settings on the Remove Duplicates menu inadvertently delete information that you wanted to keep, you can press Ctrl + Z on your keyboard to undo the action. Then simply repeat the steps in the tutorial and make the necessary adjustments to ensure that you correctly delete the duplicates that you no longer need. Do you have multiple columns of data that you would like to combine into one column? Learn how to combine columns in Excel 2010 using a helpful formula that will do it automatically.
Additional Sources
After receiving his Bachelor’s and Master’s degrees in Computer Science he spent several years working in IT management for small businesses. However, he now works full time writing content online and creating websites. His main writing topics include iPhones, Microsoft Office, Google Apps, Android, and Photoshop, but he has also written about many other tech topics as well. Read his full bio here.
You may opt out at any time. Read our Privacy Policy


