You’ve ordered a new computer from Dell, you waited for the computer to be built, then it finally arrived at your home or place of business. You unpacked everything, set it up, then turned on the computer and followed the instructions to set up Windows 7. The computer finally turns on and you are taken to a home page that contains a bunch of foreign widgets and desktop icons that you have never seen before. Most of these objects provide some value to the user experience and you might enjoy them if you spent some time using them, but you were expecting a certain experience from your new computer, and all of these items are interfering with that. So you identify the objects on your desktop that you no longer want there, and you decide that you want to learn how to remove the Dell Dock. In learning how to uninstall applications from a Windows 7 computer you discover the process, which will eventually lead to the Uninstall Programs screen in your Control Panel. However, before you remove the Dell Dock, you should do some preparations on the actual dock itself before you proceed with learning how to remove the Dell Dock. If you are not entirely certain that you want to remove the Dell Dock from your computer, however, there are many ways to customize the Dell Dock and improve your overall experience with your computer. You can read this article to see some of the customization options offered with this application.
Process to Remove the Dell Dock (Guide with Pictures)
The steps in this section will remove the Dell Dock from your computer.
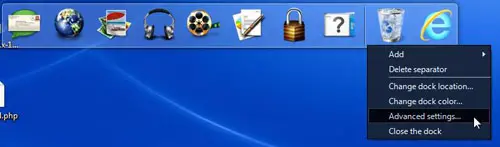
Step 1: Right-click in an empty space on the dock, then click Advanced Settings.
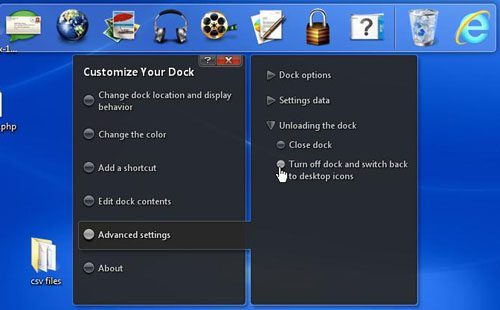
Step 2: Click the Turn off dock and switch back to desktop icons option.
Step 3: Click the Yes option to disable the dock.
At this point, you have simply disabled the Dell Dock from appearing on your computer’s desktop. The program is still on the computer, so you must go a little deeper into your Windows 7 installation to completely remove the Dell Dock.
Step 4: Click the Start button at the bottom-left corner of your computer screen, then click the Control Panel option in the column at the right side of the menu.
Step 5: Click the blue Uninstall a program link under the green Programs link at the center of the window.
This opens a window that lists all of the programs installed on your computer. On a new Windows 7 installation with a Dell computer, there are likely to be a lot of programs here that you are not familiar with. While you are in the process of removing the Dell Dock, you should also consider removing some other programs that you are not going to use.
Step 6: Step 6: Scroll through the list of installed programs until you locate the Dell Dock option.
Step 7: Click the Dell Dock option once, then click the Uninstall button in the horizontal blue bar above the list of programs. Confirm that you want to uninstall the Dell Dock, then wait until the uninstall process has finished.
Now that you have removed the Dell Dock from your Windows computer you will no longer need to worry about it taking up space on your screen. If you are looking for Dell docking station drivers, you can find them here on Dell’s website. After receiving his Bachelor’s and Master’s degrees in Computer Science he spent several years working in IT management for small businesses. However, he now works full time writing content online and creating websites. His main writing topics include iPhones, Microsoft Office, Google Apps, Android, and Photoshop, but he has also written about many other tech topics as well. Read his full bio here.