Resetting Default Windows 7 Search Settings
Like many of the more helpful features involving Windows Explorer and folders on your Windows 7 computer, such as showing hidden files and folders in Windows 7, the option that you are looking for is on the Folder and search options menu. Continue reading below to learn how you can find this menu, and where the specific button is that you need to click in order to restore your search defaults. Step 1: Click the Windows Explorer icon in the task bar at the bottom of your screen. If the folder shown in the image below is not visible, then you can click the Computer option on your Start menu, or open any folder on your computer.
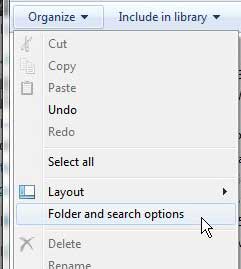
Step 2: Click the Organize drop-down menu at the left side of the horizontal bar at the top of the window, then click Folder and search options.
Step 3: Click the Search tab at the top of the window, then click the Restore Defaults button at the bottom of the window.
Step 4: Click the Apply button at the bottom of the window, then click OK. Your Windows 7 search settings should now revert to their original settings, which should help to clear up any issues that you are having with the Windows search indexer consuming a lot of your system resources. After receiving his Bachelor’s and Master’s degrees in Computer Science he spent several years working in IT management for small businesses. However, he now works full time writing content online and creating websites. His main writing topics include iPhones, Microsoft Office, Google Apps, Android, and Photoshop, but he has also written about many other tech topics as well. Read his full bio here.
You may opt out at any time. Read our Privacy Policy