Learning how to schedule emails in Outlook 2010 is important for anyone that has to send a lot of messages at specific times, especially when those times occur when they aren’t in front of their computer. Scheduling email in Outlook also allows you to delay delivery on your messages for however long you require, which can free up your schedule for other tasks. Managing your emails in Microsoft Outlook 2010 for the first time after using a free email provider’s service can be a little intimidating. Even the best free email providers do not offer anywhere near the number of features that you will find in Outlook 2010. Aside from the ability to filter emails, manage your contacts and calendars and customize your messages, Outlook 2010 also has some other advanced features that you might not have even thought possible. For instance, you can use Outlook 2010 to schedule an email to be sent at a certain time in the future. The ability to delay message delivery in Outlook 2010 like this ensures that you can create an email now, but send it at a more appropriate time later.
How to Schedule an Email in Outlook 2010
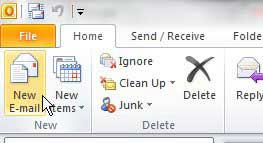
Aside from the convenience that this future message sending feature creates, it is also something that you can configure on a per-message basis. This means that you will not need to turn a setting on and off each time that you want to delay a message, but rather you have to set it up on messages that you want to send later. Begin by launching Outlook 2010 as usual, then click the New E-mail button at the top-left corner of the window. This is the button that you click whenever you want to create a new Outlook 2010 message.
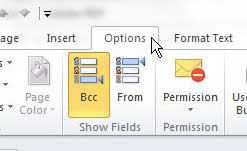
Click the Options tab at the top of the new message window.
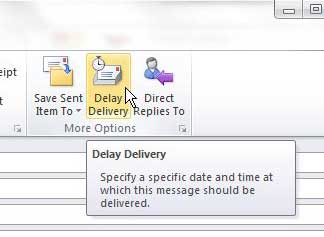
Click the Delay Delivery button in the More Options section of the ribbon at the top of the window. This opens a Properties menu.
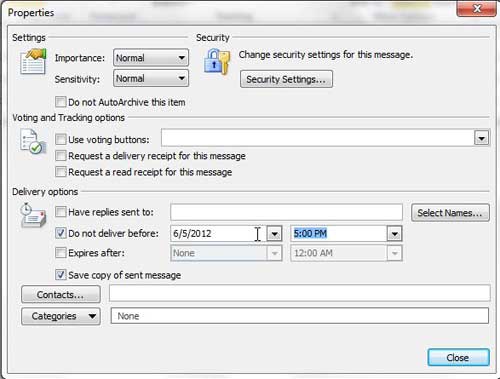
Locate the Delivery options section of the Properties window.
Confirm that the box to the left of Do not deliver before is checked, then click the drop-down menu to select the future date at which the email should be sent. Click the time drop-down menu and choose the time on that date at which the message should be sent. Click the Close button to return to the message, then complete the message as usual. Once the message is finished and ready to be sent, click the Send button. You will notice, however, that the message will stay in your Outbox instead of being moved to the Sent Items folder. It will stay in the Outbox until the time that you specified, then it will be sent. If you are using a Microsoft Exchange server you will not need to do anything special and can close Outlook and continue as you normally would. However, for people that are not using an Exchange server, you will need to have Outlook open at the time that you scheduled the email to be sent.
Summary – How to schedule an email in Outlook 2010
Would you like Outlook to check for new message either more or less frequently? Find out how to change the send and receive settings in Outlook 2010 and adjust that frequency to whatever you prefer. After receiving his Bachelor’s and Master’s degrees in Computer Science he spent several years working in IT management for small businesses. However, he now works full time writing content online and creating websites. His main writing topics include iPhones, Microsoft Office, Google Apps, Android, and Photoshop, but he has also written about many other tech topics as well. Read his full bio here.
You may opt out at any time. Read our Privacy Policy