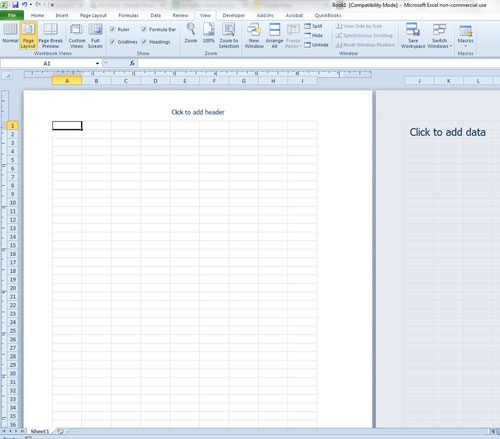
Fortunately Excel 2010 has a special view, called “Page Layout”, that you can use which will show the layout of your data on the printed page. This allows you to make adjustments to row and column sizes so that everything fits on the page as best as possible. Out tutorial below will show you how to switch to the Page Layout view.
View the Page Layout of Your Spreadsheet in Excel 2010
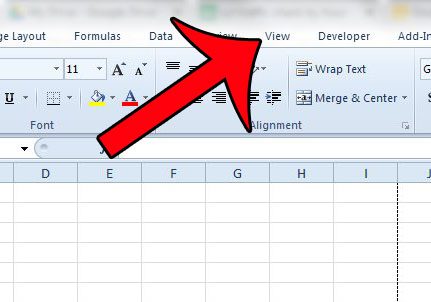
There are several different views in Microsoft Excel 2010. The default view is called Normal, and is likely the view to which you are most accustomed. If you find that the Page Layout view from the steps below does not meet your needs, then you can also select from any of the other options available in Step 3. Step 1: Open your workbook in Excel 2010. Step 2: Click the View tab at the top of the window.
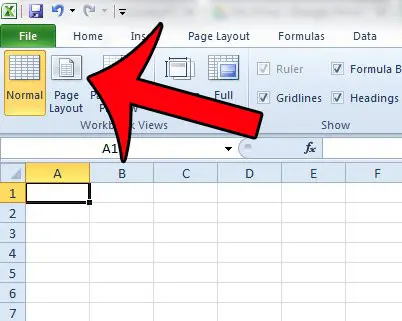
Step 3: Click the Page Layout button in the Workbook Views section of the Office ribbon.
You should now be able to view your Excel worksheet as it will be printed.
This can be very helpful when you have a multi-page spreadsheet and are worried that some data will be separated on its’ own page. You can also read this article to learn about some helpful settings that you can adjust in Excel 2010 to make your spreadsheets look better when they are printed. If you find that the page breaks in your spreadsheet do not make sense, then they may have been manually inserted. This article will show you how to remove all of the page breaks from an Excel 2010 worksheet. After receiving his Bachelor’s and Master’s degrees in Computer Science he spent several years working in IT management for small businesses. However, he now works full time writing content online and creating websites. His main writing topics include iPhones, Microsoft Office, Google Apps, Android, and Photoshop, but he has also written about many other tech topics as well. Read his full bio here.
You may opt out at any time. Read our Privacy Policy


