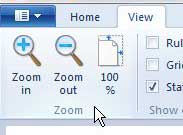
If you are just using the default view in Microsoft Paint, then you may be struggling when you need to make detailed edits of that photo. Luckily Paint has a handful of useful tools, including a way for you to zoom in or zoom out on one of your images. Our guide below will show you how to zoom in Microsoft Paint so that you can make the edits that you need to make on your pictures.
How to Zoom in on Images Using Paint
Our guide continues below with additional information on how to zoom in Microsoft Paint, including pictures of these steps. If you have pictures of your screen, such as those you would create with our how to screenshot on Acer laptop tutorial, then you can use Paint to edit them. Microsoft Paint is the default drawing and image editing tool in Windows 7 and, despite its basic appearance, is actually capable of some pretty impressive actions. However, you may think that Paint is limited in its functionality based on the default view that is available when you first begin using the program. But if you want to zoom in on detail in an existing image, or if you want to be able to make very specific, detailed edits to an image that you are viewing or creating, you can use the Zoom tool to accomplish your tasks. Have you been using Microsoft Paint for a while, but are now looking for a program with a larger set of tools? You should look into Adobe Photoshop CS6. Students and teachers can purchase it for a very low price, and there are even subscription options that make it a very affordable choice. Our tutorial on how to resize an image in Paint can show you another useful tool that exists in the free Microsoft Paint application.
Using Microsoft Paint’s Zoom Tool (Guide with Pictures)
The zooming option in Microsoft Paint can be used to either zoom in or out on an image, and can be done with the click of a button. However, some people do not realize that this tool is available because it is not visible on the default Paint screen. Paint uses the same ribbon navigation structure as Microsoft Office 2010 and 2007, which can be a little confusing if you have never seen it before. So continue reading below to learn how to find and use the Zoom options.
Step 1: Launch Microsoft Paint.
To learn about a fast way to start the Paint program, read this article on using the search function to launch programs.
Step 2: Click the Paint tab at the top-left corner of the window, click Open, then double-click the picture file that you want to work with in Paint.
Step 3: Click the View tab at the top of the window.
Step 4: Click the Zoom In button in the Zoom section at the top of the window if you want to zoom in on your image, or click the Zoom Out button if you want to see less detail of the image.
You can also click the 100% button if you want to return to the full view of the image. Now that you know how ot zoom an image in Microsoft Paint you will be able to use this feature whenever you have an image that is small and you need to be able to see some detail on it. If you have been interested in upgrading from Windows 7 to Windows 8, you should check out the different versions and pricing available to you. Windows 8 is very affordable in relation to previous versions of the Windows operating system, and it can really help improve your experience with your computer.
Additional Sources
After receiving his Bachelor’s and Master’s degrees in Computer Science he spent several years working in IT management for small businesses. However, he now works full time writing content online and creating websites. His main writing topics include iPhones, Microsoft Office, Google Apps, Android, and Photoshop, but he has also written about many other tech topics as well. Read his full bio here.


